How to Convert 4K HDR to SDR Video [Free & Online Included]


Summary: This post shows you 5 different methods to convert 4K HDR to SDR video without compromising video quality. Keep on reading to find the HDR to SDR converter that suits you.
HDR or High Dynamic Range offers a holistic color range, coupled with superior picture quality closely mirroring that observed with the human eye. Compared to SDR (Standard Dynamic Range), HDR allows you to see more of the details and colors in scenes and it has a resolution four times as excellent as an SDR video. Nowdays HDR is being adopted by the general market with remarkable ease and speed.
Though HDR displays clear, sharp, and high-quality images, the HDR files often comes with huge size and may not run smoothly on old or some new devices. What if you want to view 4K HDR videos on SDR devices (there are innumerable SDR TVs, monitors, projectors, desktop and phones) without the washed-out color issue? Upgrading your hardware is one way but it's quite expensive. If you don't plan to do this, then you'll need to lower the resolution or convert HDR to SDR videos.
There are many HDR to SDR converters on the market, but only a few of them can maintain the original 4K quality of the HDR video. Feel frustrated? Never! Here we have singled out 5 HDR converters that can help you convert HDR to SDR without compromising on the quality. Keep on reading to find your suitable one.

Table of Contents
Part 1. Something You Gotta Known About HDR to SDR
1. Currently, many online video streaming services also adopt 4K HDR HEVC 10-bit video. Considering different users posses different devices, some compatible with HDR video, others not, video content providers have to support multiple video formats to accommodate video display devices with different standards. That's why they need real-time HDR to SDR conversion. Or convert HDR 4K video to SDR video on the fly.
2. Some users on reddit forum point out that you can easily convert HDR 4K video to SDR without any converter. Just upload your HDR video to YouTube and download the SDR file with youtube-dl after processing. I don't try this method on my own, but you can give it a shot if needed.
3. To convert HDR10+ video to SDR on Samsung galaxy phone, you can directly proceed it on your phone. Head to and open Gallery, choose your HDR10+ video and tap Edit. Tap the current resolution on the upper left-hand corner of the popping-up interface, and choose your desired resolution from the list: 80% (864x1852), 60% (648x1388). Hit Save and Gallery will save a SDR copy of your input video with resolution you choose.
Part 2. Top 5 Methods to Convert 4K HDR to SDR
#1. Convert 4K HDR to SDR with EaseFab Video Converter
EaseFab Video Converter is an easy-to-use, fast yet powerful HDR to SDR converter. It's available for Windows 11, 10, 8.1, 8, 7, etc. And it has a Mac version compatible with macOS Sonoma and lower. Its features include but are not limited to:
- Convert any 4K HDR videos to SDR in 4K/1080p, HEVC to H.264 without visually quality loss on brightness, washed-out color, contrast and more.
- Free adjust resolution 4K to 1080p/720p, 60FPS to 30FPS, aspect ratio 18:9/1:1 to 16:9 or vice versa...
- Finish conversion at fast speed, owing to the support for the world's most advanced Intel QSV, Nvidia CUDA/NVENC, and AMD 3DNow! Tech.
- Edit videos by trimming, merging, cropping, adding subtitle, etc.
[Tutorial] How to convert HDR to SDR with EaseFab Video Converter
In the following guide we take EaseFab Video Converter Windows version as an example. Mac version shares the same steps.
Step 1. Run the program and click the Add Video button to load your 4K HDR video files. Batch conversion is supported.
Step 2. Click Profile bar and move mouse cursor to Common Video category and select MP4 (codec: h.264+ aac) as the output format. You can choose HEVC MP4 as output format if your destination device supports HEVC playback.
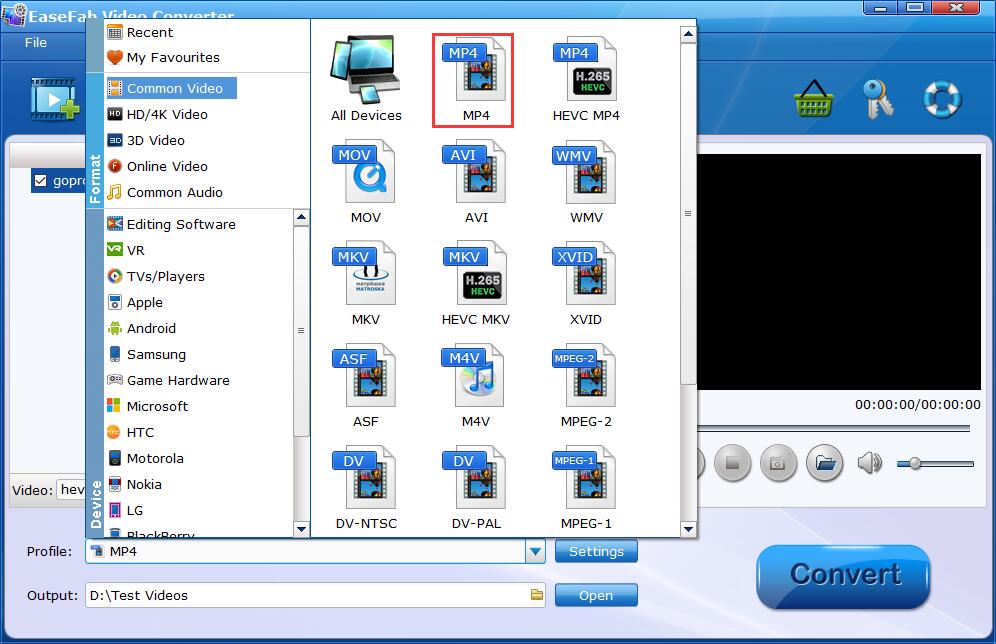
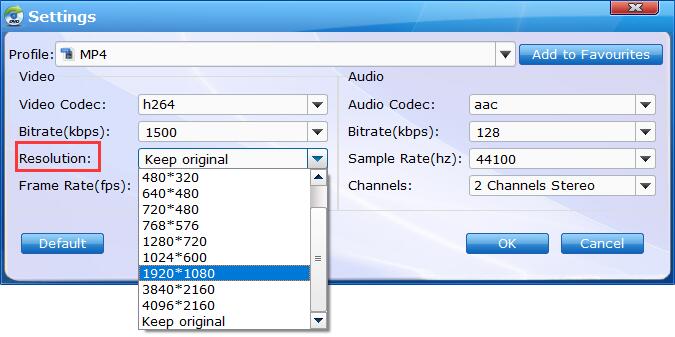
Tips: If you wanna retain 4K resolution, you can choose MP4-4K from HD/4K Video category. To get lower resolution for better compatibility with your display, tap Settings icon on the main interface and tweak 4K to 2K, 4K to 1080p/720p at your willing.
Step 3. When you have finished everything, simply click "Convert" button to perform HDR to SDR conversion in no time.
#2. Transcode 4K HDR to SDR Free with FFmpeg
FFmpeg is a very powerful command line tool that can transcode video and audio files. You can use it to convert HDR to SDR on Windows, Mac and also Linux machines. Now, let's show you how to carry out this work on Windows.
Step 1. Go to http://ffmpeg.org/download.html and download FFMPEG zip file. Then, create a folder named FFmpegTool in C drive. Unzip the file you just downloaded and move all files into FFmpegTool folder.
Step 2.Paste the following code to a new created batch file.
F:\Torrents2\ffmpeg\bin\ffmpeg.exe -i F:\Torrents2\ffmpeg\bin\video-input.mp4 -vf zscale=t=linear:npl=100,format=gbrpf32le,zscale=p=bt709,tonemap=tonemap=hable:desat=0,zscale=t=bt709:m=bt709:r=tv,format=yuv420p -c:v libx264 -crf 25 -r:v 30 -c:a copy -preset ultrafast -tune fastdecode -max_muxing_queue_size 1024 F:\Torrents2\ffmpeg\bin\video-output.mp4
Save it as a batch file by adding .bat at the end of the file name and put it in the 'bin' folder. Then, add your HDR video into F:\Torrents2\ffmpeg\bin\ and rename it as "video-input.mp4".
Step 3.Press Windows button+R to open the "Run" box. Type "cmd" and tap "OK" to open a regular Command Prompt. Finally, type convert.bat file to start the conversion from 4K HEVC 10bit HDR video to SDR video named "video-output.mp4".
When the conversion is finished, you can put your resulting SDR video on any platform and device for playback, no washed-out color issue.
#3. Free Decode 4K HDR to SDR with Handbrake
HandBrake is an open source video transcoder available for Windows, Mac, and Linux. It allows you to change 4K HDR video to SDR video with MP4 or MKV output format.
Step 1: Import your 4K HDR video via "File" under "Source Selection" or directly via drag-and-drop. Then, just wait for it to scan the title. It normally takes a few seconds. Once done, the detailed video info will show up in "Source" section.
Step 2: Choose the output profile from the right-hand panel. Generally, Handbrake offers you with the default profile - Fast 1080p30 under General column. Of course, you're also allowed to choose the specific device profile under Device column, including Roku, Xbox, Playstation, Fire TV, iPhone, Android, Chromecast, etc. Select "Production Standard" under Production or the general profile under Legacy column if you want to convert 4K HDR to 4K SDR without resolution degradation.
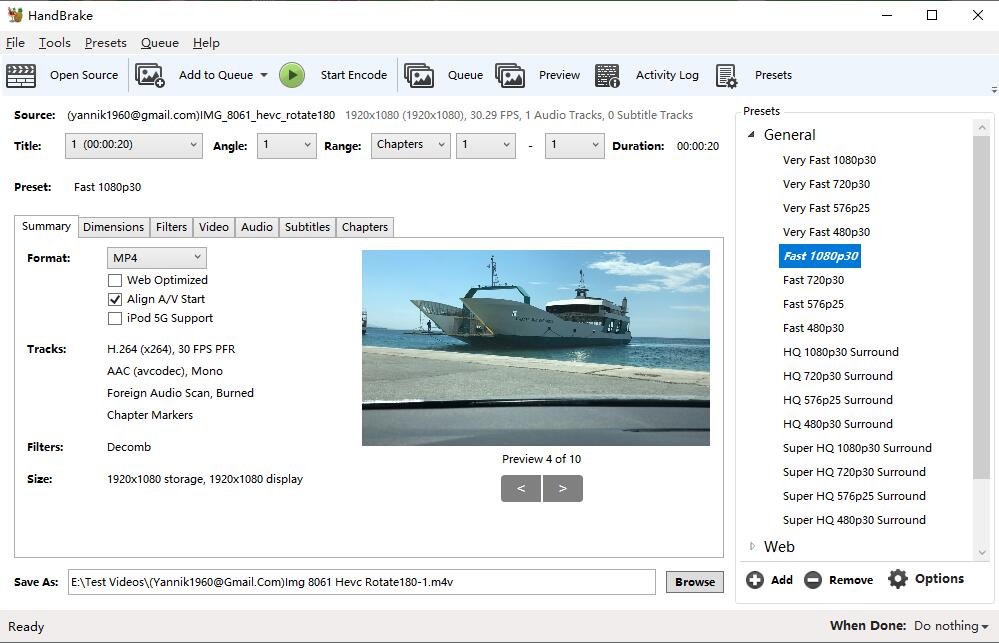
Step 3: Opt for format MP4 or MKV, confirm desired resolution, video codec (H264, HEVC, MPEG-4 or MPEG-2) and quality.
Step 4: Click "Browse" button to choose the destination folder for saving the resulting file. Afterwards, tap "Start Encode" button to begin converting HDR to SDR.
#4. Convert HDR to SDR on Mac with Final Cut Pro
If you're planning to upload your iPhone HDR videos to YouTube or watch them on the screen that doesn't support HDR, Final Cut Pro is a nice option to convert HDR contents to standard SDR. Moreover, it also supports to convert MXF or MOV files that were encoded directly using the HLG (Hybrid Log-Gamma) or PQ (Perceptual Quantizer) standard to SDR standard mode.
[Tutorial] How to convert HDR to SDR using Final Cut Pro
1. Launch Final Cut Pro on your Mac computer and import your HDR video into it.
1. Open the Effects browser, select the Color category on the left, then double-click HDR Tools to add the effect to the clip selected in the timeline.
3. Click the Inspector button on the right side of the toolbar, and then click the Video button at the top of the inspector.
4. Click the Mode pop-up menu in the HDR Tools section of the inspector, then choose HDR to Rec. 709 SDR to Rec. 709 standard-dynamic-range (SDR) luminance levels.
Note: If you know clearly that your clips are HLG or PQ variants of HDR, you can choose the more specific conversion options:
- HLG to Rec. 709 SDR
- PQ to Rec. 709 SDR
- PQ Output Tone Map
- HLG to PQ (Rec. 2100)
- PQ to HLG (Rec. 2100)
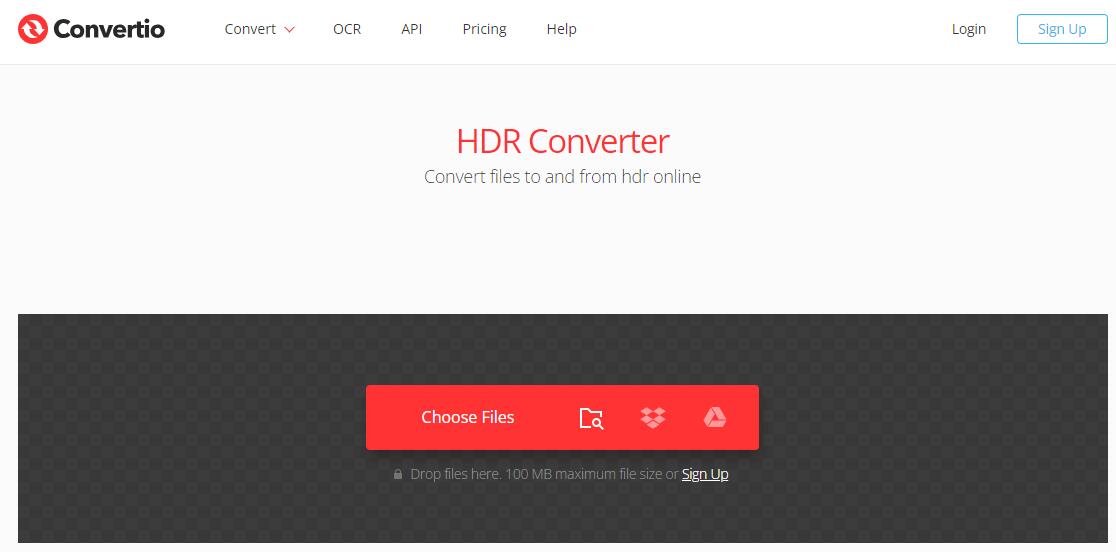
#5. Convert HDR to SDR Online with Convertio
If you don't want to install any additional software on your computer, then you can give a try at online HDR to SDR converter. Convertio is an excellent choice for users who need to encode HDR files and other video formats online. However, you must note that Convertio is available only to change the color gamut and range of images between HDR and SDR. And like many online tools, the conversion speed is quite slow and the video file size is limited.
[Tutorial] How to convert HDR to SDR online using Convertio
Step 1. Navigate to the site https://convertio.co/hdr-converter/.
Step 2. Click the Choose File tab to add the HDR file.
Step 3. Choose the SDR color gamut.
Step 4. Tap the Convert button to change HDR to SDR.