Chromebook laptop is a new type of online computing thin client based on Google Chrome OS, only workable after being connected to the Internet. You are supposed to operate all web-based APPs or surf the Internet through Chrome browser, with all related source materials stored in the cloud. However, Chromebook does not have any Windows or Mac applications. It even doesn't have an internal DVD drive due to relatively smaller hard drive capacity, which means you can not directly play DVD on Chromebook.
Is it possible to watch video DVDs on Chromebook with external USB DVD drive?
The short answer is NO. While it is possible to connect an external USB DVD drive to a Chromebook, you cannot currently watch DVD movies with Chrome OS. Unlike simple movie file formats that you might find online, playback of DVD Video on Chromebook requires special decoding software and codecs to work. Google has not licensed this software and included it with Chrome OS, although, it should be possible for third party companies to write DVD video player software for Chromebooks and Chromeboxes. Considering that no Chrome OS devices ship with DVD hardware, it is unlikely that Google will license DVD Video software and include it in Chrome OS.
A possible solution to get Chromebook to play video DVDs (Not Recommended)
Of course, it would be possible to watch video DVD movies on Chromebook using crouton along with software like VLC, but this requires switching your Chromebook into developer mode and installing a secondary operating system, something that is not recommended for everyday Chromebook users.
100% working solution to fix Chromebooks not playing video DVDs
- Digitize DVD collection on PC/Mac and store them on cloud, USB drive or external hard drive for Chromebook
What if you still want to use Chromebook to play movies and TV series on DVDs? As you know, physical DVD discs are indeed not as convenient as digital files, but you can convert DVD to digital file formats like MP4, MKV, AVI, MOV, etc. on another Windows or Mac PC and then save digital copies to cloud, USB drive, external hard drive for further playback on your Chromebook. This way you can not only save up on your local storage, but also be able to protect your DVD discs from warping, scratching, and breaking.
To rip and digitize video DVDs for Chromebooks, you're recommended to adopt EaseFab DVD Ripper for help. This software is available to cope with both home-made and store-bought DVD discs without hassle. And it has the top performance when converting DVD to MP4, MKV, MOV, etc. files and you can easily get best possible balance in fast speed, optimal quality and small size.
Disclaimer: Ripping DVD involve a gray area of copyright law. Fair use suggests that you should be able to rip them for personal use, but in some countries this is patently illegal. So it is necessary to consult the related laws in your country before ripping protected DVDs and make sure the copy is totally not for commercial use.
Tutorial: Digitize and save them to cloud, USB, etc. for playback on Chromebook
To begin with, you need to download and install EaseFab DVD Ripper Windows or Mac version on our computer. The guide below takes the Windows version for example.
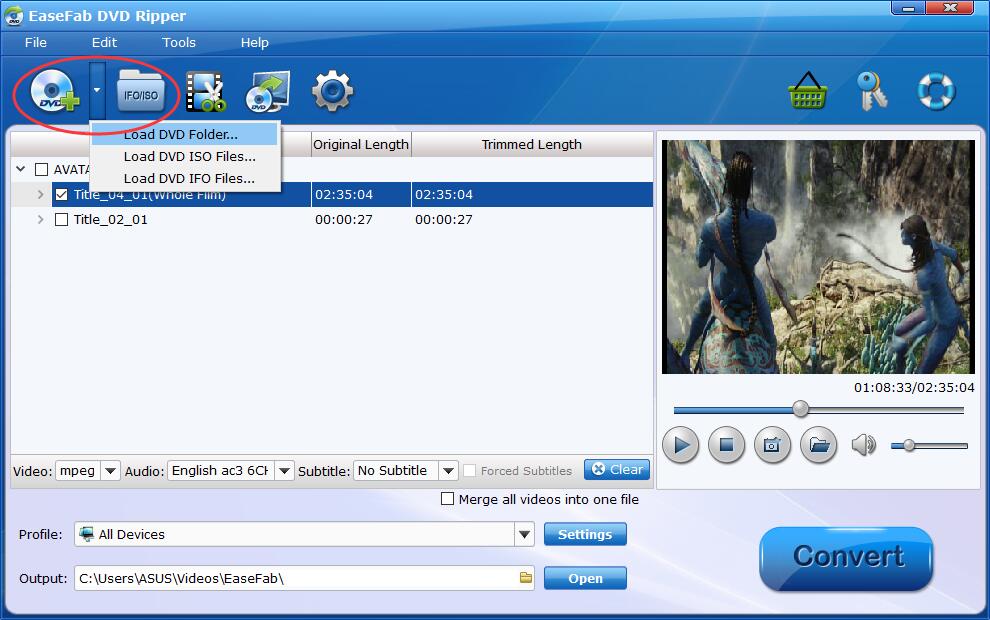
Step 1. Put target DVD disc into the DVD drive of your computer and click Load disc button at the top left corner of EaseFab DVD Ripper to load the source DVD disc. As you see, you can also load ISO, Video_TS folder to the program.
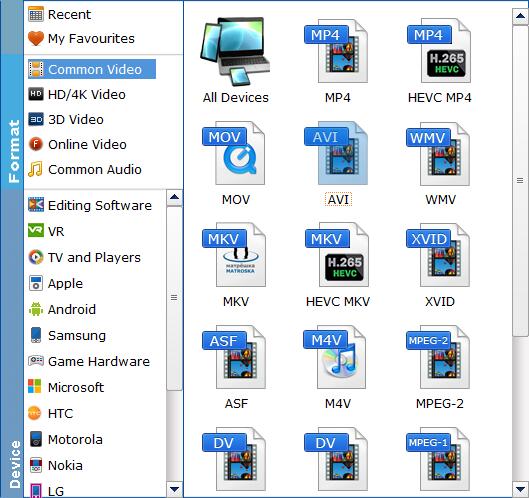
Step 2. Click Profile bar and then choose a desired output format profile. If you'll archive the result file into cloud for playback, make sure the chosen format is supported by Chromebook and the cloud storage service you use. For general uses, MP4 (h.264+aac) in "Common Video" is recommended, as it's widely supported by many devices and media players.
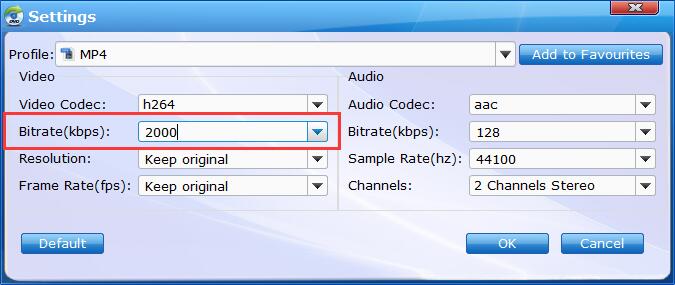
Step 3. If need to get a good balance between file size and output quality, flexible options are offered to further reduce the size of the ripped video. Click Settings button below the profile and enter into the parameter settings page. A slew of other variables such the video/audio codecs, pixel dimensions, frame rate, bit rate, audio sampel rate, etc. will help convert a DVD at 7.5GB to a smaller MP4 file to make more room for your cloud, USB or external hard drive.
Recommended video size settings:
◆ You're not suggested to adjust the frame rate and aspect ratio, if not necessary.
◆ Lower the bitrate to a lower level. Adjusting the original Normal quality to bitrates of around 1800-2000 is acceptable and can make your ripped MP4 movie around 1-1.6GB in size, 80% smaller than the original DVD movie, and to the naked eyes, it's highly unlikely to distinguish the difference between the original movie and the re-encoded video.
◆ Lower the resolution. Typical DVD videos are 720×480 (NTSC) and 720×540 (PAL). Adjust the resolution to 640×480 won't make any quality difference.
Step 4. When all these settings are ready, you can click the Convert button to begin the DVD ripping and conversion.
When the ripping is done, you can click on Open button to locate the ripped videos. Now, things become much easier. You can upload them to cloud storage services, such as Dropbox, OneDrive, Google Drive, Amazon Drive, and iCloud or your USB drive, now you're able to access to your DVD file library on your Chromebook as long as internet connection is available or plug the USB stick to your Chromebook.