3 Easy Ways to Work with MKV Files in Premiere Pro
"Is there any way to use .mkv files in Premiere without converting? The thing is, I want to use TV show clips, and those are only available to me in a .mkv format in HD. I don't really wanna convert ~12hrs of 1080p footage, so is there any sort of plugin that enables directly importing it?"
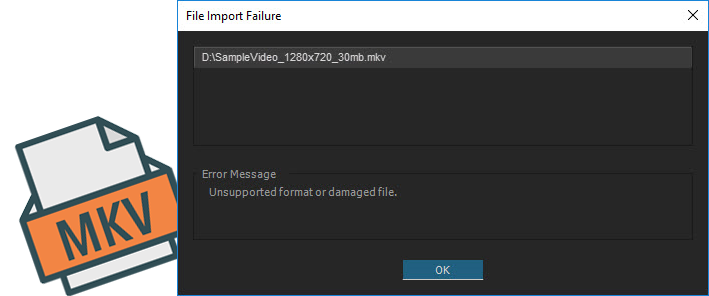
MKV is a distribution container format which can contain various video, audio codecs and subtitle tracks. Many of the videos we download from websites, get from friends, ripped from Blu-rays, or record by screen capture software like OBS are MKV files. We can easily play MKV files on computer with many media players including VLC. However, editing MKV files has long been a headache for Premiere Pro users. When you try to import MKV file to Adobe Premiere Pro (2025 included), the failure window will pop up with an error message "File format not supported" or "Unsupported format or damaged file".
Does Premiere Pro support MKV? How to use MKV files in Premiere Pro? Keep on reading to find the answers and 3 easy ways to work with MKV files in Premiere Pro (2025) without errors.
Tablest of Contents
- Does Adobe Premiere Pro Support MKV?
- 3 Workable Solutions to Use MKV Files in Premiere Pro
- #1. Convert MKV to Premiere Pro Supported Codec/Format with EaseFab (100% Working)
- #2. Convert MKV to MP4 for Premiere Pro with VLC
- #3. Rename the File Extension from MKV to MP4
- FAQs about Premiere Pro and MKV
- Conclusion
Does Adobe Premiere Pro Support MKV Format?
Adobe added the import support of MKV files for Premiere Pro CC 2018 (12.1-12.1.2) and Premiere Pro CC 2019 (13.1.2). However, it discontinued that support since Premiere Pro CC 2019 (13.1.3).
In fact, till now, MKV has not been added to the official supported format list of Adobe Premiere Pro.
Our previous MKV file format was limited to decoding for playback. We have never offered support for encoding MKV, and overall usage of this format has been very low.
Users who need access to MKV files can consider third-party utilities. For rendering out video content for online platforms we encourage our users to take advantage of existing output options, such as H.264 and HEVC formats, which are widely used and supported.
Therefore, if you're using recent versions like Premiere Pro 2024 (24.6)or earlier versions like Premiere Pro CC 2017, you will not use the MKV files in Permiere Pro. What if we update or roll to the version that can support MKV natively when meeting MKV import failure in Premiere? Unfortunately, things might still doesn't work.
This is because MKV is just a container format which can hold various video and audio codecs. The Premiere Pro can recognize the MKV container, but things inside the MKV container might be encoded by codecs that are unsupported by the program, which will lead to file import failure.
3 Workable Solutions to Use MKV Files in Premiere Pro
Some people may suggest you to try installing the K-Lite Codec Pack to fix MKV import failure. However, we don't recommend this because this has been known to cause issues with the Adobe Suite, such as crashes, slowdowns and other issues.
Luckily, there are some simple and workable ways to successfully import MKV files to Premiere Pro without error. And below are 3 useful solutions to do that.
Solution 1: Convert MKV to Premiere Pro Supported Codec/Format EaseFab
If you need a 100% useful way to use MKV files in Premiere Pro without any error, converting MKV to Premiere Pro via EaseFab Video Converter is the anwser. This professional yet efficient tool lets you convert MKV to MP4, ProRes, MOV and hundreds of other formats in one click without losing the original picture quality.
- Accept all HD/4K MKV files with differnet encoded video/audio codecs.
- Convert MKV to MP4, MOV, AVI, H.264, ProRes and more Permiere natively supported formats. Batch conversion is supported.
- Finish conversion at 3 steps at fast encoding speed without causing the quality loss.
- Easy editing experience: cut, crop, merge and more.
[Tutorial] How to Convert MKV to Adobe Premiere Pro Friendly Format
PS: The process is almost the same on PC and Mac. Here we will take EaseFab Video Converter for Windows as the example to show the MKV to Premiere conversion process.
Step 1. Load the MKV files.
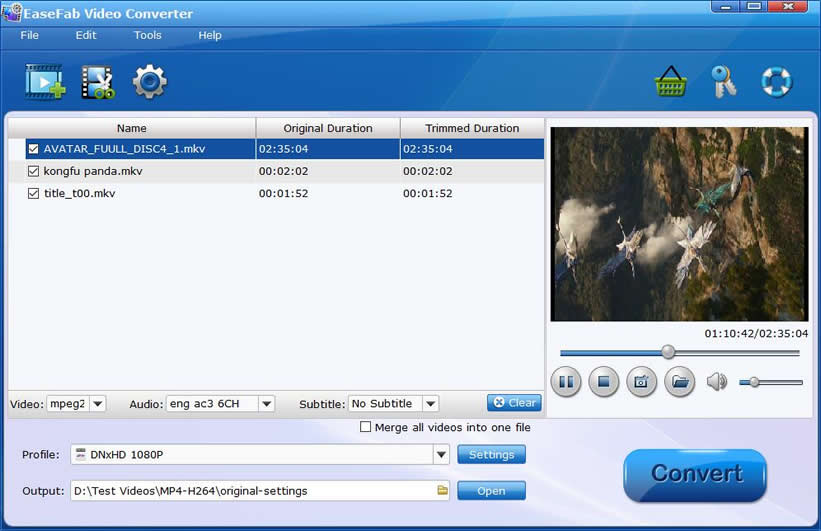
After downloading, install and run EaseFab Video Converter on your PC or Mac, simply drag and drop your MKV files to the program. You can also click Add Video button to load your source files. (Note: batch conversion is supported, so you can load more than one file to save time.)
Step 2. Choose an Adobe editing-friendly format.
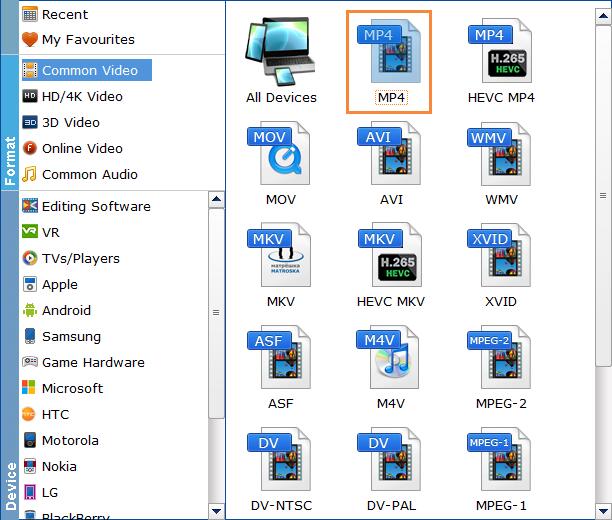
Based on our test, VC-1 is not supported by Premiere Pro. So here we take converting MKV VC-1 to MP4 H.264 as an example. Click "Profile" bar and move mouse cursor to "Common Video" and then select "MP4 (codec: h.264+aac)". MP4 is not the only option that can import to Premiere Pro. Converting MKV to ProRes, DNxHD, MOV, etc works too. There is a long list of output video formats available for you to choose.
Kindly Note: The high-quality codecs DNxHD and ProRes profiles can be found in Editing Software category. If you're short on drive space, it's recommended to convert MKV to DNxHD for Premiere Pro on Windows, or ProRes on Mac.
Tips: You can cut, crop, merge, rotate to make some easy video edits before conversion with EaseFab Video Converter.
Step 3. Start the conversion.
Hit "Convert" button and it will begin fast video decoding, conversion and processing your MKV video at one go. Hardware acceleration can be enabled to speed up the processing, only if your computer has supported graphics cards.
Once done, you can easily import the encoded MKV file to Adobe Premiere Pro, Premiere Elements, DaVinci Resolve and any other NLE without any trouble.
Solution 2: Convert MKV to MP4 for Premiere Pro with VLC
VLC media player is widely recognized as a free and open source audio and video player capable of playing a wide range of media formats, including those from external media libraries and Blu-ray discs. It also serves as a powerful and free video encoding tool that can help you convert MKV to MP4 for importing to Premiere Pro. However, converting MKV for Premiere using VLC may have some problems, such as being slow, no audio, choosing wrong audio track as the default language. Therefore, this solution is only recommended for those who've already installed VLC on their computer.
Step 1. Go to the official site of VLC media player to download and install the software.
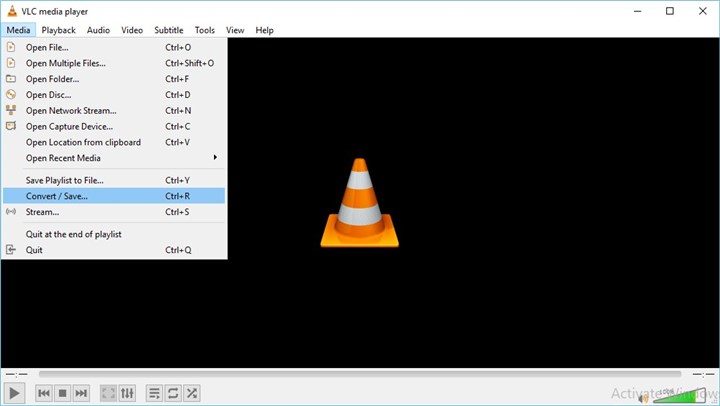
Step 2. Launch up the software, click on Media on the top menu bar, and choose Convert / Save.
Step 3. Hit Add, choose the target MKV file that you want to import to Premiere and hit Open.
Step 4. Hit Convert / Save on the right bottom of the Open Media panel.
Step 5. Click on the down-triangle button, choose Video – H.264 +MP3 (MP4).
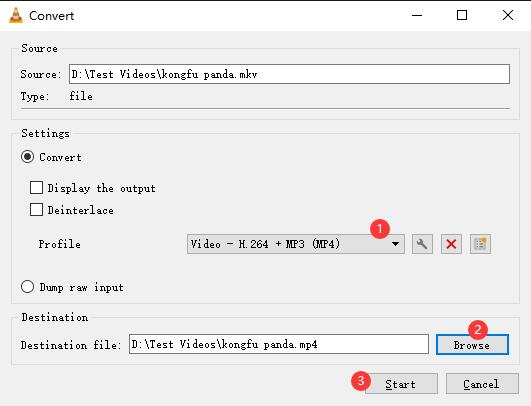
Step 6. Select Browse, choose the output file folder. Hit Start. That's it.
Be patient to wating for the MKV to MP4 conversion. Once complete, you can import the result MP4 files to Premiere Pro.
Solution 3: Rename the File Extension from MKV to MP4
Sometimes, you just need to simply change the file extension from .mkv to .mp4 or other Premiere Pro supported container format to fix the MKV import failure. However, be sure the new container format is compatible with the codecs inside the MKV container, or you might damage the original footage.
Right click on your .mkv file, and choose Rename. Then, change the file extension from mkv to mp4, avi, or something that Premiere Pro can recognize. Then click Yes when a warning pops up. Once done, put the file into Premiere Pro and see if it can be imported without error now.
FAQs about Premiere Pro and MKV
Why is MKV not supported in Premiere Pro?
MKV is a container format that can contain various video and audio codecs. If the codecs in MKV are not supported by Premiere Pro, then you can use the MKV files in Premiere Pro.
Why does Adobe remove MKV support in Premiere Pro?
Premiere Pro removed and then later partially reinstated native MKV support because the MKV container is complex, supporting various video and audio codecs, which can be difficult to implement comprehensively. Adobe originally added MKV support but removed it to reduce the complexity and resources needed for the software, though it was re-introduced with limited H.264/AAC support in 2025.
How to work with MKV files in Premiere Pro?
If you can't import an MKV file or the MKV file isn't working properly in Premiere Pro, you are suggested to convert MKV file to Premiere Pro supported formats with EaseFab Video Converter before importing.
Conclusion
To use MKV files in Premiere Pro, converting MKV files with EaseFab Video Converter is your best choice and it's a 100% working solution. It's a professional yet efficient tool that can help you convert MKV to MP4, MOV and high-quality codecs like ProRes or Avid DNxHD for using in Premiere Pro, DaVinci Resolve and other non-linear editing software. Thanks to a self-explained interface, you're never left feeling in any doubt about what you're meant to do.


