3 Ways to Fix Can't Import HEVC/H.265 Videos to Premiere Pro


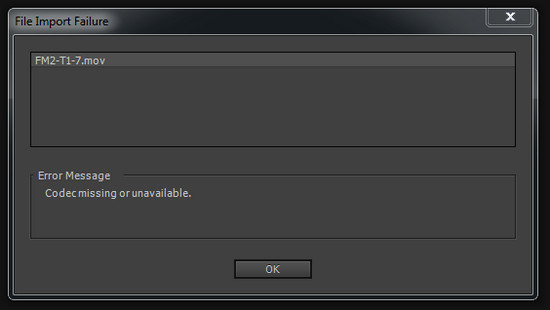
Today, more and more phones and cameras support 4K video shooting using HEVC codec as it can save nearly half the bit rate of H.264 with the same high quality. However, the high-compressed format requires insanely huge computing resources, it's not ideal for video editing, especially on low specs computers. Even those users who work with Adobe Premiere Pro are reporting various problems. The error message goes like "codec missing or unavailable" while importing HEVC videos to Premiere Pro or "file format not supported," or choppy or lagging 4K video playback after importing.
Why are your HEVC videos not able to be imported into Adobe Premiere Pro? What are the HEVC codec for Premiere Pro solutions? Read on to unlock the answers.
Table of Contents
Why Can't You Work With HEVC Videos in Adobe Premiere Pro?
Does Premiere Pro support HEVC codec? The answer is Yes. Since the version 12.0.1, H.265 media with resolutions up to 8192*4320 with the .mov and .mp4 extensions are fully supported. However, even if you're using the latest version of Premiere Pro, you may still have HEVC codec for Premiere Pro problems. Why? This reasons can be various. Now let's analyze the possible causes clearly.
- You're using an old version of Adobe Premiere Pro. To work with HEVC (H.265) footage in Adobe Premiere Pro, ensure you have the latest version of Premiere Pro and Media Encoder (12.0.1 or higher)
- You're using a trial version of Premiere Pro CC. The trial version doesn't recognize HEVC files. Only licensed Adobe Creative Cloud members can use HEVC codec.
- You have a poor computer hardware which can cause HEVC not importing to Premiere Pro error.
- HEVC codec is missing in Adobe Premiere Pro. Therefore, you need to correctly download and install HEVC codec for Premiere Pro.
- HEVC is a very processing-intensive format, so you can create proxies or transcode the HEVC footage to H.264 or ProRes and then import it to Premiere Pro.
- Delete your Media Cache folders or tweak Premiere Pro settings for a try.
- Make sure to be running macOS 10.13 and later on Mac and 1809 above on Windows 10.
How to Fix HEVC Codec Issues on Premiere Pro?
Overall, HEVC is not ideal for video editing because it's highly CPU-intensive, leading to poor playback and rendering performance. Therefore, to fix the issue, converting HEVC to editing-friendly codec like H.264 or ProRes is a common practice as these codecs require less computing power.
Besides transcoding, you can also fix that by correctly installing HEVC codec for Premiere Pro or upgrading the program. Or you can adjust settings of Adobe Premiere Pro for a try.
Solution 1. Convert HEVC to H.264 or ProRes for Premiere Pro
If you target the deep-rooted issues by exploring do you really need HEVC in video editing, you will learn that the HEVC codec poses challenges for Premiere Pro because HEVC is a non-performant format that is difficult to edit with and requires much computing power to process. If you don't want to break the bank and upgrade to high-end computers with fancy hardware, you can convert HEVC to H.264, ProRes or other editing-friendly codecs. This is an easy yet efficient solution to fix HEVC codec for Premiere Pro problems.
To do this, you can adopt EaseFab Video Converter for help. Available for both Windows and Mac users, this dedicated video converter comes with transcoding profiles using editing-friendly codec such as ProRes 4444, ProRes 422 and other ProRes families, as well as H264 MP4 for smooth video importing and editing. Apart from changing file format, it can also help convert your VFR videos to constant frame rate.
EaseFab Video Converter - One-Stop Solution for Converting HEVC to Premiere Pro Compatible Formats
- Accept HEVC videos from GoPro, DJI, iPhone, Canon camera, etc.
- Output media in file formats like H.264, ProRes, etc. natively supported by Adobe Premiere Pro.
- Convert video in 3 simple steps. GPU Hardware acceleration makes it super fast.
- Easy editing experience: cut, crop, merge, add effects..
Now free download and install EaseFab Video Converter according to your computer OS. After that, you can convert HEVC to Adobe Premiere Pro accepted H.264 or ProRes format in 3 simple steps, without quality loss.
The below guide takes EaseFab Video Converter for Windows screenshots for example. The process of converting HEVC codec for Premiere Pro is the same.
Step 1. Run EaseFab Video Converter, and then click Add Video button to import the target HEVC files. Dragging and droppping works too. (Note: batch conversion is supported, so you can load multiple videos to the program to convert at a time.)
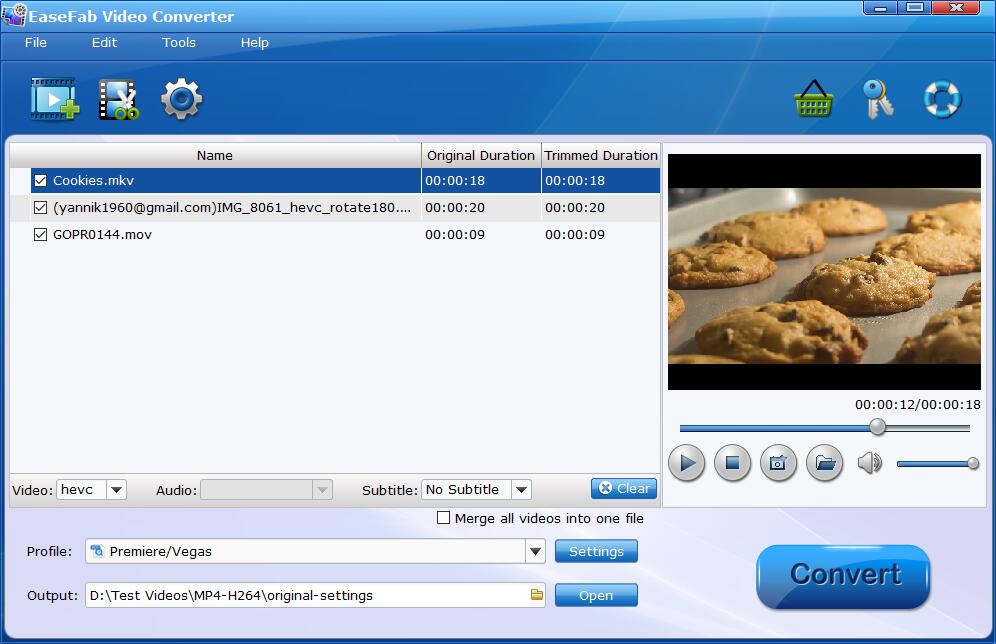
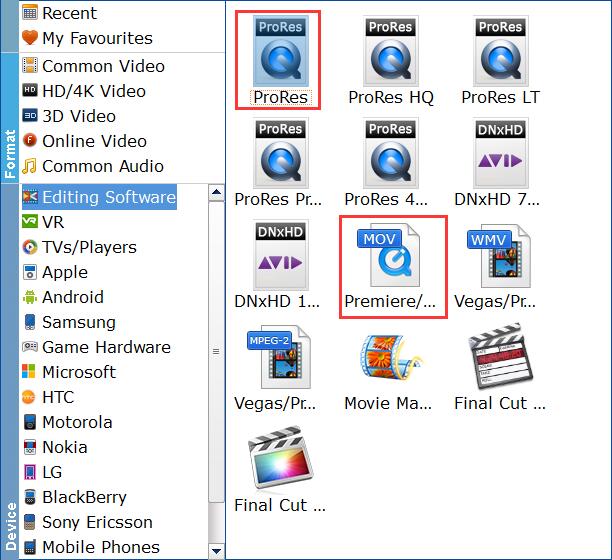
Step 2. Click Profile bar at the bottom. and choose an Adobe Premiere Pro compatible preset, such as MP4 H264 from Common Video category, or MOV H.264, ProRes, etc. from Editing Software category.
Pro Tip:
1. With ProRes or H264 MP4, you can edit smoothly on the timeline and scrubbing for real time previewing, which is important for making editing decisions and get inspired when playing around. There won't be any image quality difference.
2. H.264 is really optimized to be a delivery codec while ProRes is optimized to be an editing codec. That said, if you just need to do a simple edit and your computer has the power to edit H.264 you can get away with it no problem, but if you plan to do a heavy edit with lots of transitions and effects and color grading you will be best served by ProRes.
Step 3. Hit Convert and it will begin fast video decoding, conversion the HEVC/H.265 video to H.264 or ProRes encoded video at one go.
After the conversion is complete, get the resulted files via clicking the Open button and then you can import the result files to Adobe Premiere Pro without any trouble.
Solution 2. Download and install HEVC codec for Adobe Premiere Pro
Step 1. Open Adobe Premiere Pro and enter your license.
Step 2. Import your HEVC-encoded video into Adobe Premiere Pro, and then you may receive a prompt as shown in the picture. (Some users might not get this message.)

Step 3. Click OK to perform HEVC codec installing.
Step 4. Restart your computer.
Once done, Adobe Premiere Pro should be able to import your HEVC footage without popping up codec missing error. However, not everyone can install HEVC codec successfully.
"Yeah I got that popup and pressed OK, but I got some error. It says 'The importer reported a generic error'."
"So I clicked OK and got a message saying the codec was missing."
And, the import error may still persist even if you have managed to install HEVC codec. What's more, installing new codec may cause new problems. It may lead to codec conflict and failure of reading some files.
Solution 3. Upgrade your Adobe Premiere Pro
Adobe Premiere Pro extends the support for HEVC files with the release of Adobe Premiere Pro CC 2015.1, but doesn't support QuickTime (MOV) wrapped HEVC files until the arrival of Adobe Premiere Pro CC 2018 (12.0.1). Therefore, if you need to import HEVC files in MOV format, may be from your iPhone, into Adobe Premiere Pro, make sure you're using version 12.0.1 or later. Below are the steps to upgrade Premiere Pro to the latest version.
Step 1. Save your work and close your Adobe apps, or you will receive a warning to close.
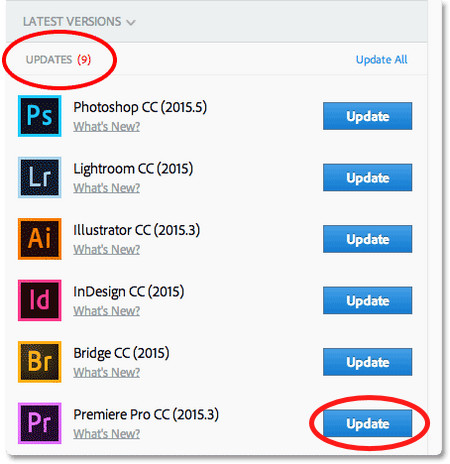
Step 2. Open Adobe Creative Cloud desktop app, click Apps tab, and then you will see those installed Adobe apps including Adobe Premiere Pro CC. When there're available update versions, you'll see Update buttons next to the apps.
Step 3. Click Update next to Adobe Premiere Pro CC. If you want to update all apps, you should click Update All.
Step 4. Set Advanced Options.
- Select or deselect Import previous settings and preferences. If this option is checked, settings and preferences of your previous version will be moved to the new version.
- Select or deselect Remove old versions. If this option is checked, your previous version will be removed.
Step 5. After finishing all settings, click Update to start upgrading Premiere Pro CC to the most recent version.
If you fail to update Adobe Premiere Pro CC, see if the solutions to troubleshoot Creative Cloud download and install issues can help you.
If you are still unable to import HEVC/H.265 footage into Adobe Premiere Pro CC after upgrading, it may be because your HEVC files use variable frame rate (VFR). Although Premiere Pro had an update to support VFR, it still can't deal with most of VFR videos. You need to convert your videos from variable frame rate to constant frame rate using a HEVC converter, such as EaseFab Video Converter. This probably solves your problem.
Final Words
HEVC/H265 is not designed for video editing because it comes with the cost that the highly-compressed file is more complex to decode and encode, not to mention the complexity brought about in 10-bit HEVC videos from DJI Mavic Dlog-M, Canon R5 Clog and many other cameras.
If you've tried your efforts (e.g. installing HEVC codec or upgrading the Premiere Pro) and still can't fix Premiere Pro HEVC import failure, don't hesitate to convert HEVC to H.264 or ProRes in solution 1. It's an easy yet 100% working solution.