 1. Quick-Start Guide
Note: We have both Mac and Windows version for Video Converter. This is a simple quick-start guide on how to use EaseFab Video Converter for Mac. For the whole detailed guide on how to use Video Converter for Mac, you can take Video Converter Windows tutorial ↗ for reference. The Mac version has the same functions if there is no special remark.
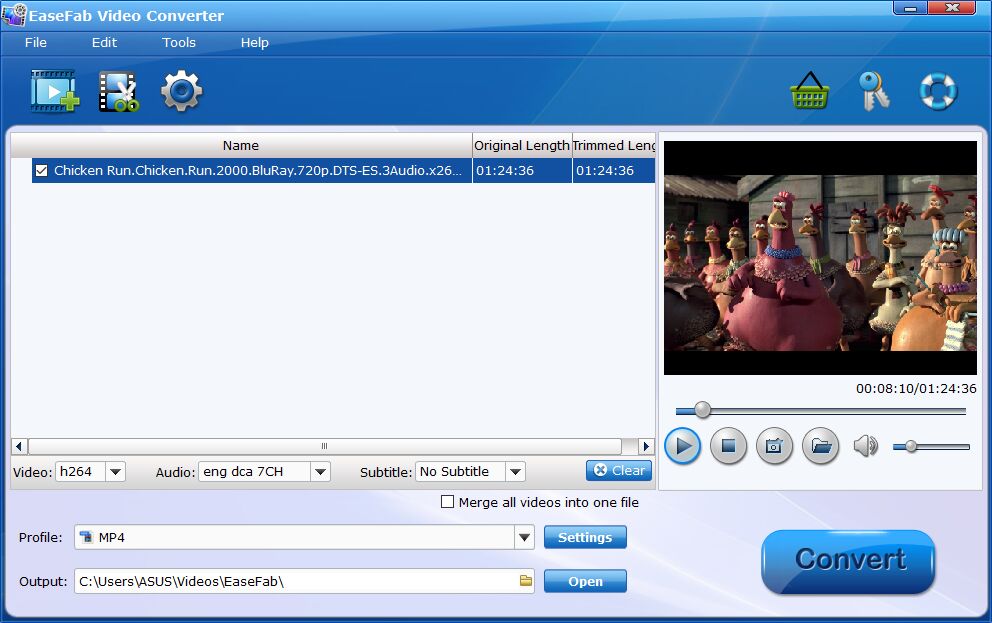
Open EaseFab Video Converter for Mac, then you can easily convert video in 3 steps: Add Your Video > Select Output Format > Start the Conversion.
1.1 - Import Video Files
Click the Add Video button to load video or audio files from your Mac or other devices like USB device, camcorder, MP4 player, etc. You can also directly drag and drop the files you want to convert to the main interface.
Note that batch conversion is supported so you can add as many files as you like at one time.

1.2 - Select Output Profile
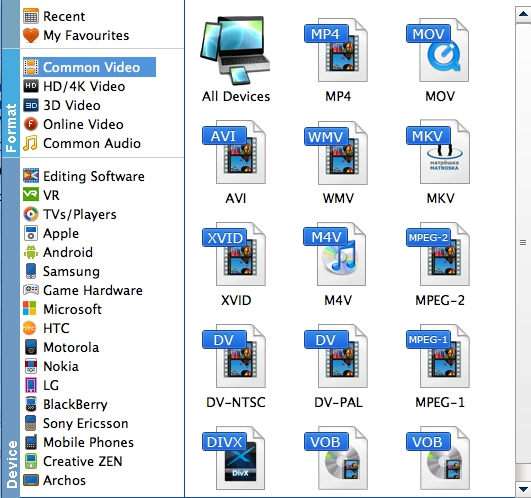
Click Profile (located below where your files are displayed), you can choose a format or device from the list of preset profiles.
(Optional) After choosing the right profile, you can then click Settings button to adjust video and audio parameters. You can also click Edit button to make your own creation in minutes.

① "Common Video" & "HD/4K Video"
You can choose commonly-used output format from the format list or customize which formats to be shown on the list. As you see, all regular video like MP4, MOV, MKV, WMV, AVI, FLV, with H.264/MPEG-4/HEVC codecs are provided. Moreover, there are available 4K outputs and HD outputs, etc.
② "3D Video"
EaseFab Video Converter can help you create your own 3D videos from common videos. Click the Format bar, you can choose output format from the 3D Video format list or customize which formats to be shown on the list.
③ "Online Video"
Transcode video to MP4, MPEG4 or FLV for YouTube, Facebook and other social networks.
④ "Common Audio"
If you want to extract audio from video, you can directly choose an audio format here.
⑤ "Editing Software"
If you want to encode video for smooth editing, you can directly choose a professional "intermediate" or "production" codec like Apple ProRes, DNxHD, Apple Intermediate Codec, and more. here.
⑥ "VR", "TVs/Players", "Apple"...
If you want to convert videos/movies for playback on iPhone, iPad, Android, smart TVs, game console, etc. you can simply browse to find device and select it as the output format to get videos with optimized settings from corresponding category.
※ This video converter enables you upscale 2K/1080P footage to 4K and downscale 4k UHD to lower resolution at fast speed.
1.3 - Start the Conversion
(Optional) Just below Profile is Output, you can click the ![]() icon to change the location where you want to save converted video.
icon to change the location where you want to save converted video.

After everything is OK, hit the Convert button at the lower-right corner to start the conversion.
You can Pause or Cancel the conversion. Also, you can choose shut down computer and open output folder when conversion completed.
 2. Edit
Integrated with edit features, EaseFab Video Converter for Mac lets you make your own creation in minutes. Click ![]() button to pop up the edit window.
button to pop up the edit window.
2.1 - Trim
Trimming videos is one of the useful features to edit videos, which can remove the unwanted parts as a video shortener by trimming the unwanted part and combining the left clips together, trim a long videos into several small segments for convenient sharing or watching.
To trim a video, please switch to Trim tab in Video Editor Interface and follow any of the methods below:
1. Drag the control sliders to include the segment you want to remain.
2. Click the left square bracket to set start point, and click the right square bracket to set end point when previewing the video.
3. Input specific values to Start and End box.

2.2 - Crop
The Crop facility enables users to get rid of the black edges and unwanted area of the image.
Switch to Crop tab and follow any of the methods below:
Here you can drag and move the rectangle on the video to set the crop area or enter the accurate crop values on Left and Top. Meanwhile, you can Zoom in or out, change the aspect ratio. In this way, you can remove the black bars of your videos.

2.3 - Apply Effect
EaseFab Video Converter offers brightness, saturation, contrast adjustment as well as 4 filters for you to apply stunning video effect. Now follow the simple steps to make your video more stylish.
Switch to Effect tab to apply effect to your videos. You can easily adjust the brightness, contrast, saturation settings and select deinterlace as you need. There're also 4 widely-used filters for your selection, choose a favourite one and click OK to confirm.

Check Apply to All and then you can apply changes to all videos you added.
2.4 - Add Watermark
If you want to stamp your videos with your name or other indentifying marks, you can add a watermark via the simple tutorial below.
Switch to Watermark. Under Watermark tab, you can create a text watermark to personalize your video. Type whatever text you want in the blank input field next to it. You can also adjust the font, transparency, vertical and horizontal position of your watermark.

Check Apply to All and then you can apply changes to all videos you added.
2.5 - Volume & Rotate
Have you ever captured video with a cell phone or compact camera only to find it's vertically oriented and you can't view it properly? Don't worry, EaseFab Video Converter can help you easily rotate your video for wathing without problem. Moreover, you can easily increase volume in one step.
There're clockwise, anticlockwise, flip horizontal and flip vertical 4 options for you to rotate the video.

Drag the bar to increase or decrease volume

2.6 - Add Subtitles
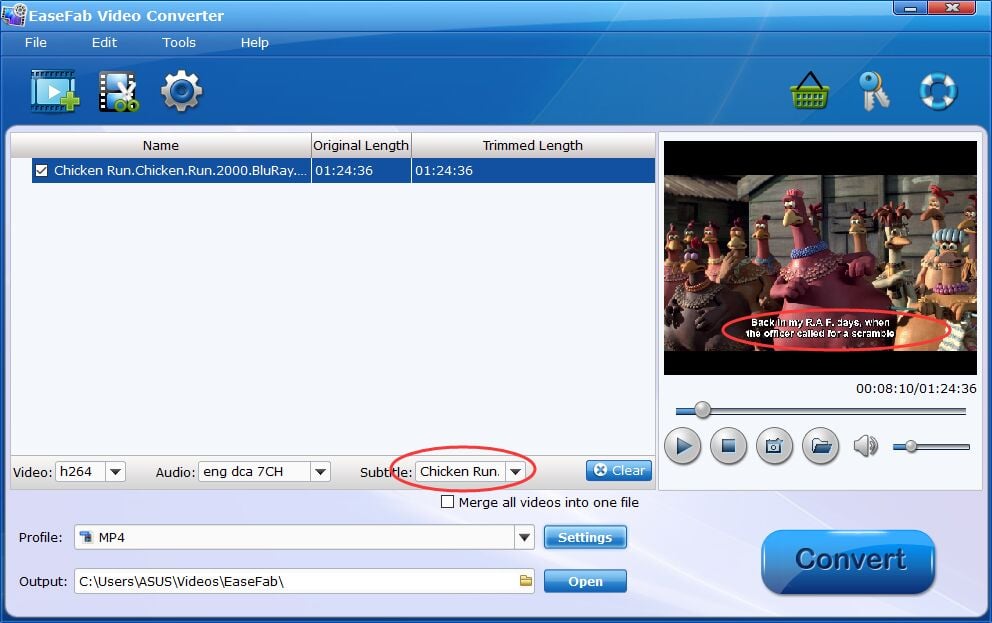
Besides converting and editing, EaseFab Video Converter also offers adding subtitles to MP4, AVI, MKV and other mainstream video formats. You can select the embedded subtitle track or add subtitle to your video in the following steps. In the following steps, we will take how to add subtitles to MP4 video for example.
Add the videos
Before you start, you need to add the videos to EaseFab Video Converter.

Add subtitle
To add the subtitles you like, simply click "Subtitle" and click "Add Subtitle" tab to browse and import your *.srt, *.ass, *.ssa subtitle file you want to embed.

After that, you can have a preview of the subtitle effect to make sure all goes OK .

Start adding subtitles to MP4 Video.
Before conversion, click the Profile bar and keep the MP4 format. Or, you can also directly choose a device to save MP4 video with subtitles to play on the device (e.g. iPhone, iPad, Galaxy Tab, PS Vita, etc). And then click the Convert button and now you have finished all steps of attaching subtitle to MP4 videos.
 1. Quick-Start Guide
 2. Edit