How to Copy DVDs to Hard Drive on Windows 11/10 & Mac


Summary: This article mainly walk you through the process of ripping and transferring DVD collection to hard drive. It introduces how to copy homemade DVDs directy, and 4 easy ways to copy protected DVDs to hard drive on Windows and Mac.
Physical DVD discs are prone to scratching and may fail to play properly if not preserved correctly or due to mechanical issues. Fortunately, copying DVDs to hard drive can help avoid lots of potential harms and embrace the flexibility of playback. For instance, by saving DVDs on an external hard drive, you can play them TV without finding the disc and being tethered to a DVD player. And once the DVD is copied to the hard drive, you can further transfer the files to your laptop, smartphone, or tablet effortlessly for enjoyment on the go.
In this guide, we will explain how to copy DVD collection to hard drive, covering both homemade and copy-protected discs. It includes two main parts: directly copy for homemad DVDs and the 5 DVD ripping methods for commercial DVDs with copy protection. Keep on reading and find a way that suits you best for transferring DVD movies to your hard drive for easier playback and backup.
Table of Contents
How to Copy & Past DVD to Hard Drive Directly?
Directly copying only works for DVDs without copy protection, like homemade ones. This method copies the the entire DVD structure to hard drive, which might not be playable on all devices. You may need a media player (e.g. VLC media player) that can handle DVD folder structures. Here is how to copy DVD to hard drive directly for free.
Step 1. Insert the DVD into your computer's DVD drive.
Step 2. Open the DVD drive in File Explorer (Windows) or Finder (Mac). Here you will see folders like 'VIDEO_TS' and 'AUDIO_TS'.
Step 3. Select the files or folders you want to copy.
Step 4. Drag and drop them to a location on your computer or your external hard drive that connected to your computer.
Notes:
This way only work for DVDs that do not have copy protection. And it might lose data, especially during interruptions. Moreover, the digital copy may not be played on your computer or TV due to format compatibility issues.
How to Transfer Protected DVDs to Hard Drive
Is it possible to copy the contents on store-bought DVDs to hard drive directly? The short answer is NO. Generally, instead of "copy DVD", we say "rip DVD to hard drive". Why? There are various encryptions imposed on a commercial (store-bought) DVD to prevent you from copying a DVD to hard drive or other storages directly. If you directly copy and paste, you will end up with failure and find the DVD empty, the files corrupted, or unplayable...
In addition to the DVD copy protection schemes, Firmware faults, mechanical failure, and overheating computer also lead to DVD copying failure. As a result, a DVD to hard drive converter/ripper is requried if you want to copy protected DVDs to hard drive successfully.
In this section, we will introduce the top 4 picks for ripping and transferring DVDs to hard drive with a brief note on what each does best—whether it's handling protected discs, fast conversion, or broad format support. Click any tool name to jump straight to its full review.
- #1. EaseFab DVD Ripper - Best overall. Digitize rip any homemade and commercial DVDs with fast speed. Offer flexible quality controls.
- #2. HandBrake - A popular free option for homemade DVDs. You need to install libdvdcss to bypass DVD CSS protection. Offer extensive format customization.
- #3. VLC - Best for simple tasks on unencrypted discs and some CSS encrypted DVDs, though speed and reliability may vary.
- #4. MakeMKV - Excellent for decrypting DVDs and Blu-rays, with a focus on MKV format. Simple, fast, but limited in output options.
Method 1. Copy DVD to Hard Drive with EaseFab DVD Ripper
EaseFab DVD Ripper is a professional yet simple DVD ripping tool with powerful DVD ripping capabilities. In addition to home-made DVDs, it can also effortlessly digitize and rip all protected DVDs to hard drive with just a few clicks. It can handle all the DVDs that you may have - new releases, 99-title, scratched DVDs, regional DVDs, Japanese DVDs, or workout DVDs. To be specific, it can:
- Bypass all DVD encryptions including CSS, DRM, X-project, UOPs, RCE, APS, and region locks.
- Convert DVD to any digital formats MP4, AVI, MKV, WMV, H.264, H.265, MP3 and any other media formats.
- Offer 200+ optimized presets for iPhone, iPad, Android, HDTV, game console, etc.
- Copy all DVDs to hard drive SSD, HDD, USB, NAS, cloud, etc. with zero quality loss.
- Create perfect 1:1 DVD backups as ISO images or DVD Folders.
- Offer customization options, such as selecting specific titles, choosing audio tracks and subtitles, trimming unwanted clips, and more.
- Finish DVD conversion at ultra-fast speed on old/low-end PCs and Macs with low CPU usage.
Who it's for: EaseFab DVD Ripper is a ideal for users with extensive DVD collections who want a fast and cost-effective solution to transfer copy-protected DVDs to hard drive on Windows or Mac. Unlike VUDU that charges per DVD conversion, EaseFab DVD Ripper offers both one-year license and lifetime license. During the eligible period, users can convert as many DVDs as they like without any additional costs.
[Tutorial] How to rip DVDs to hard drive with EaseFab DVD Ripper
The step-by-step guide takes Windows version for an example, Mac version shares the same process.
Step 1. Download EaseFab DVD Ripper on your Windows or Mac by clicking on either of the green buttons above. After that, install it on your computer.
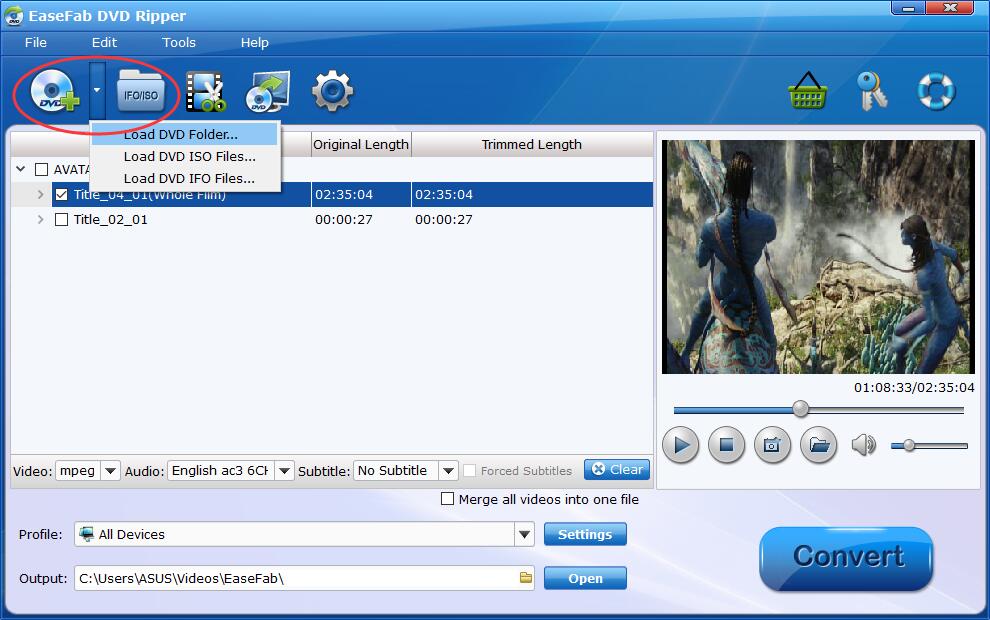
Step 2. Insert the DVD disc into your computer's DVD drive or an external USB DVD drive. Launch EaseFab DVD Ripper, click Load DVD to add the DVD files to the program. All loaded files will be displayed on the left item bar. You can also load ISO, Video_TS folder to this program.
Step 3. On the Profile panel, there are over 500 profiles including popular formats and device-specific presets. You can choose to rip DVD to any digital files for furhter copying to hard drive. Below are some suggestions.
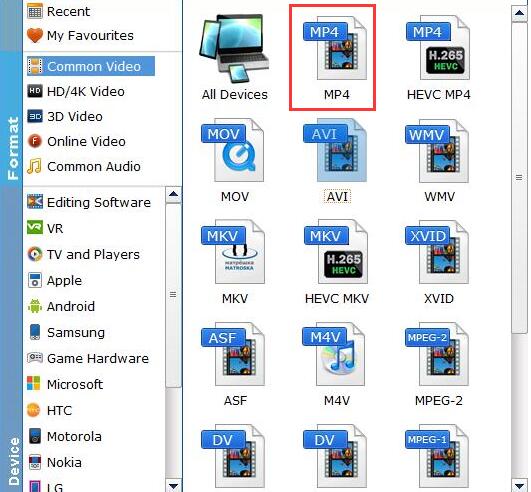
① If you want to copy DVD sto external hard drive to play on TV, LG/Samsung TV, PS5/4, Switch, Xbox One, PC, Mac, and other devices, you can convert DVD to MP4 file format for its wide compatibility, good quality, and small file size. Just go to "Common Video" category and select "MP4" as the output format. You can also select AVI, M4V, MOV, MKV etc. depending on the use of the files, or say the output devices or players that will be connected to.
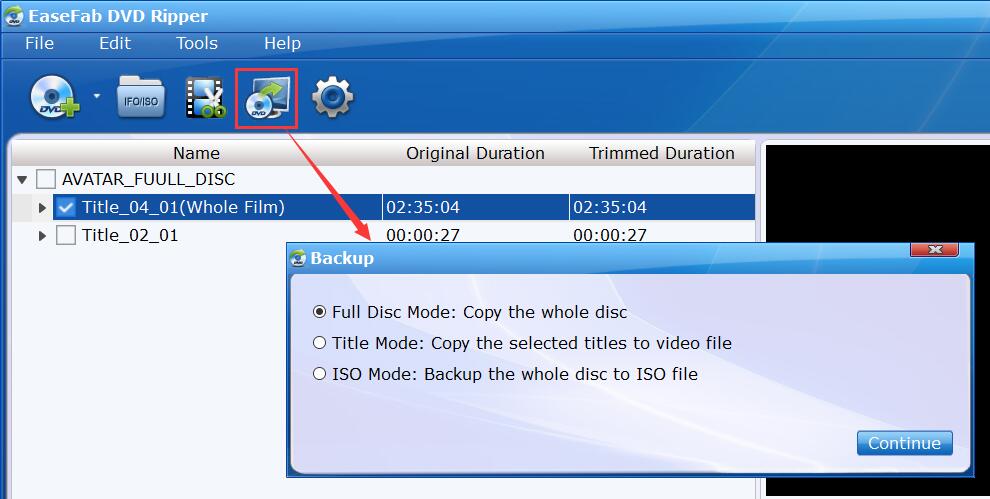
② If you want to copy DVDs in 1:1 ratio to hard drive without quality loss, select "Full Disc Mode: Copy the whole content of disc", "Title Mode: Copy the selected movie title" or "ISO Mode: Backup the whole disc to ISO file". These modes allows you to copy DVDs with 100% quality, all the menus, tracks, extras, etc. But you should know that the 1:1 dvd backup files will take quite a large size and make sure your hard drive has enough space.
Note: EaseFab's DVD backup mode neither degrades video quality nor reduces file size (movie size stays almost the same as original 4.7GB or 8.5GB). If you have some portable hard drives that are formatted in FAT32, with restrictive 4GB file size limit, it's suggested to rip DVD to MP4 H.264, for it strikes a perfect balance between file size (around 1-1.2GB) and output quality.
Step 4. Click "Folder" button in the Output bar, and select a destination folder to save DVD back-ups. If you want to copy DVD to external hard drive to watch on TV, connect the external HDD to your computer and choose it as the destination.
Step 5. When everything is done, hit the big Convert button to begin ripping and copying DVD to hard drive. The ripping time depends on your settings and computer performance. With the support of hardware acceleration, EaseFab DVD Ripper is one of the fastest software tools to copy DVD to hard drive, running at speeds of around 300-500fps which is five or more times the speed of competitors.
Afterwards, you can sort your movies or TV shows quickly in your computer, and even transfer and watch the DVD video on your Android, iOS gadgets. If you want to transfer your DVD library backups to external HDD or SSD such as Samsung Portable SSD T5, SanDisk Extreme portable SSD, connect it with a USB cable, send your DVD copies to external drive, and then you can stream them to your laptop, PC or TV as per your needs.
Cons of the Method:
- It isn't compatible with Linux.
- The free version is limited to 3-minute exports.
Method 2. Copy DVD to Hard Drive Free with Handbrake
HandBrake often emerges as a top recommendation for converting DVDs to hard drive. It is widely recommended due to being free and easy to use. HandBrake allows users to digitize DVDs to common video formats including MP4, MKV, and WebM. Additionally, it provides a range of customization options for video and audio output, making it ideal for users seeking greater control over their conversion process.
Who it's for: HandBrake is suitable for those with limited budgets for DVD conversion. It is a good choice for digitizing non-protected DVDs. However, if you intend to transfer copy-protected DVDs to hard drive with HandBrake, you will need to install libdvdcss to bypass DVD copy protection.
[Tutorial] How to save DVD to hard drive free with HandBrake
Step 1. Get Handbrake Ready.
Download and install Handbrake on your Windows or macOS computer.
Step 2. Install libdvdcss for HandBrake.
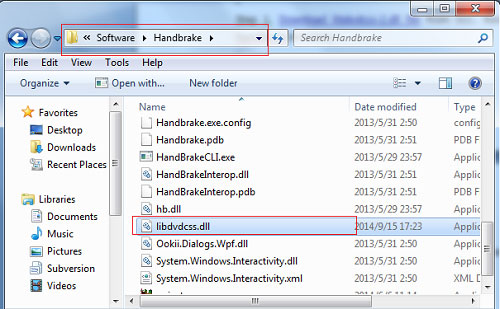
Download libdvdcss.dll 32-bit/64-bit version through the VLC website.
Next, you need to move the libdvdcss.dll into the installation folder of HandBrake. The process is different on Windows and Mac. For details, please go to this article How to rip protected DVD with Handbrake to learn more.
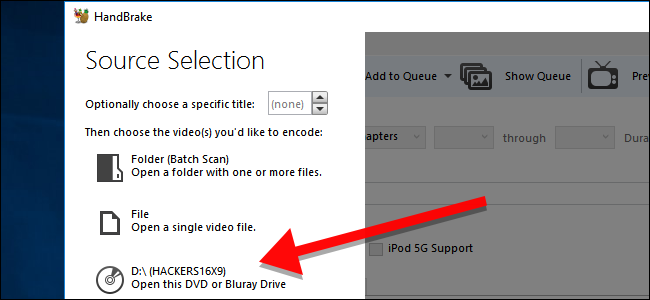
Step 3. Load Source DVD.
Insert the DVD disc into computer disc drive or an external DVD drive. Launch Handbrake, load the DVD from the Source Selection. It will take some time to scan the DVD titles.
Note: If the DVD you try to copy to hard drive has 99 titles or is protected with RCE, Disney X-project DRM or Sony ARccOS, you are likely to get an error message like "No valid source or titles found". In this case, I'm afraid that you'll have to resort to other professional DVD decrypters for help.
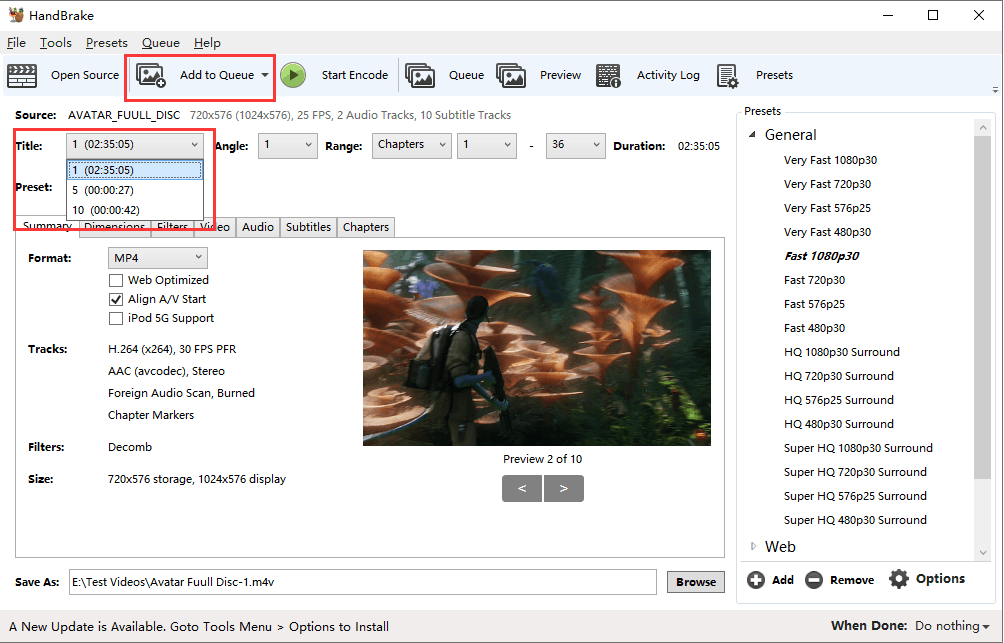
Step 4. Specify DVD Title.
Choose the title you want to convert and copy to hard drive and adjust the angel and chapters you want to retain. The auto-selected title may be not the movie title. You'd better check it before ripping.
If you need to rip DVD with multiple titles, you can click the drop-down arrow beside Add to Queue and choose Add current, Add all, or Add selection.
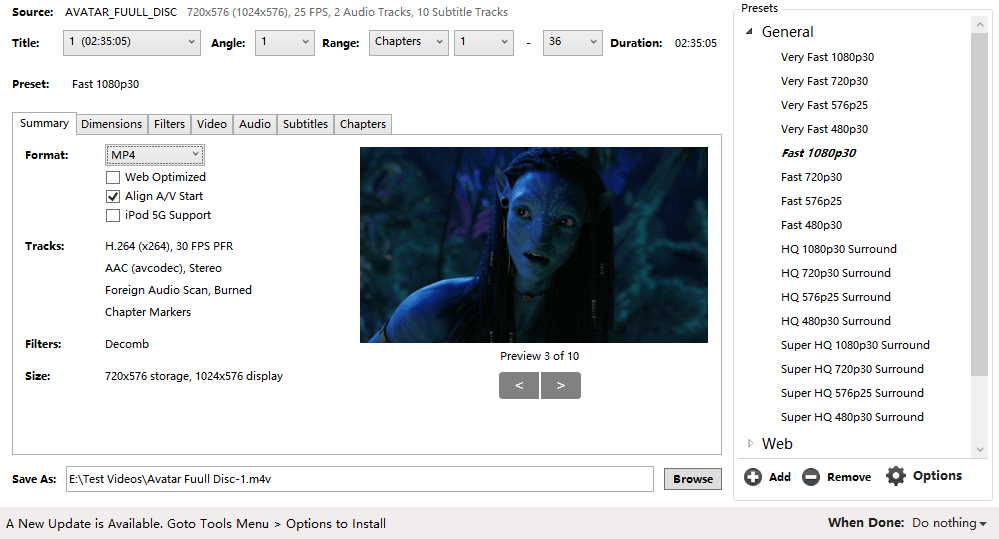
Step 5. Configure output.
HandBrake DVD ripper empowers you to convert DVD to MP4, MKV, and WebM format. In addition, it offers dozens of output presets, grouped under General (1080p, 720p, 576p, 480p), Web (Gmail, YouTube, Vimeo, Discord), Devices (Android, Apple, Chromecast, Playstation, Amazon Fire, Roku, Xbox), Matroska (H.264, H.265, VP8, VP9), and Production. You can choose any one at will, or add personalized preset by clicking Save New Preset.
When choosing a preset, don't choose 720p and 1080p presets for DVDs. The resolution for PAL DVD is 720 x 576 (576p), while the resolution for NTSC DVD is 720 x 480 (480p). Choosing a larger preset won't make the output look better but bigger.
One more thing, "Fast" and "Very Fast" presets will sacrifice some output quality, while "HQ" and "Super HQ" presets will slow the DVD ripping speed and increase output file size.
Besides container format and preset, HandBrake also allows you to select subtitle, specify audio track, tweak video parameters like codec and framerate, set quality, and do so much more. But if you know little about those features, just keep the default settings untouched.
Step 6. Start Copying DVD to Hard Drive.
Click the Browse button to choose a folder of your hard drive as the destination and click Start Encode to begin ripping DVD to hard drive with Handbrake.
Disadvantages of the Method:
- It does not have a direct option to make an exact copy of your original DVD. It is more like a DVD ripping (that would compress the video), not a copying tool.
- You need to install libdvdcss.dll to deal with encrypted DVDs.
- Mac computer has schemes (System Integrity Protection) to make your installing of libdvdcss harder.
- It takes time for a beginner to understand.
Method 3. Copy DVD to Hard Drive Free with VLC
As popular multimedia player, VLC allows users to play virtually any multimedia content without the need to rely on codecs for it, thanks to the large number of these that come by default in the program. Although many users are unaware, this player has many more functions and features within it. One of the features offered by VLC is the ability to rip a video DVD or a music disc. It can turn DVDs to digital files like MP4, WebM, TS, MKV, AVI, WMV, MP3, and so on. for storing on hard drive or other storage devices.
Who it's for: VLC is suitable for users who wish to rip DVDs and are comfortable with a potentially slower conversion speed. It's worth noting that VLC's conversion process may take as long as the duration of the movie itself, as VLC technically "streams" the video to a file on your hard drive. Moreover, VLC doesn't have DVD copy feature and VLC's native DVD transcoding results in quality degrading.
[Tutorial] How to transfer DVDs to hard drive free with VLC
Step 1. Get VLC Ready.
Download and install VLC on your computer. Skip to the next step if you already have VLC installed on your computer.
Step 2. Import the DVD Content.
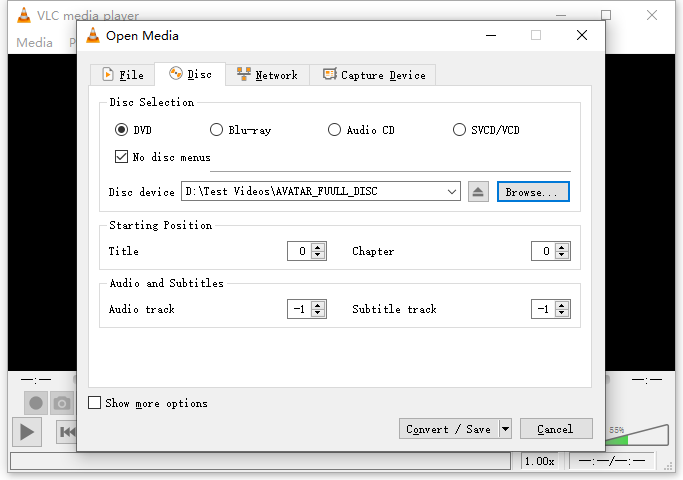
Insert the DVD disc to DVD drive. Open VLC, click Media > Convert / Save … > Click Disc tab from the Open Media window and make sure you see the DVD you want to copy beside Disc device. Here you also need to choose title, audio and subtitle. Since there is no preview window, you may need to do some trial and error to figure out which track is the one you want. Then, tap Convert / Save button.
Step 3. Choose an Output Format and Begin Converting DVD
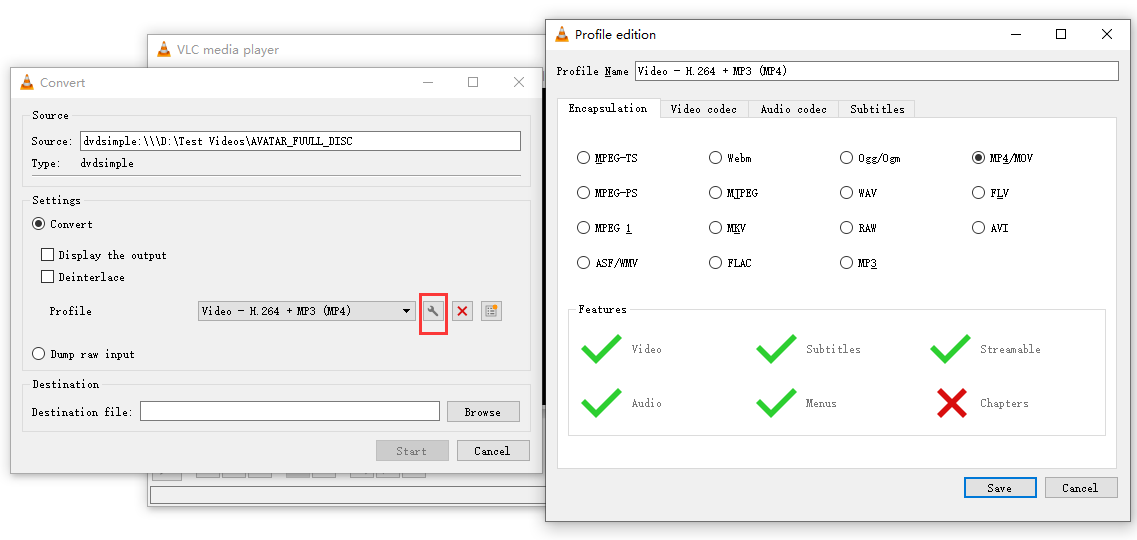
Choose a profile and specify the destination as you like, and click Start. Then, it will begin converting DVD. You can see the progress bar under the playback window.
Tips: If you need to edit the selected profile, you can click the wrench icon. You can click the Encapsulation to change container format, click Video codec to change encoding format, bitrate, quality, frame rate, resolution, and filter, click Audio codec to change audio encoding format, bitrate, channels, and sample rate, and click Subtitles to choose codec and specify whether you want to overlay subtitles on the video. When you finish the settings, don't forget to click the Save button to save your settings.
Disadvantages of the Method:
- It requires quite a long time to digitize DVD.
- Strictly protected DVDs are not supported.
Method 4. Copy DVD to Hard Drive with MakeMKV
MakeMKV is a popular free software option for copying DVDs to hard drive. It specializes in converting DVDs and Blu-ray discs into MKV (Matroska) video files. With its intuitive interface, MakeMKV makes the DVD copying process simple and accessible, even for beginners. It ensures that the original video and audio quality of the DVD is preserved during conversion, allowing you to enjoy high-quality content on your computer.
Who it's for: MakeMKV features a simple and user-friendly interface, making it an excellent option for beginners who may be new to DVD and Blu-ray ripping. Its straightforward navigation system ensures that users can easily navigate through the software without encountering any complexities.
[Tutorial] How to transfer DVDs to hard drive free with MakeMKV
Step 1. Visit the official MakeMKV website and download the appropriate version of the software for your operating system. Follow the installation instructions to complete the installation process.
Step 2. Insert the DVD you want to copy into the DVD drive of your computer or an external DVD drive that connected to your PC.
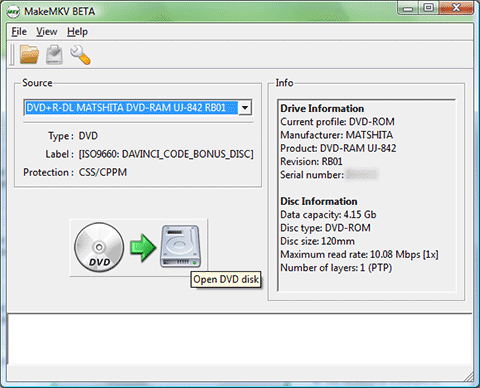
Step 3. Open the MakeMKV software on your computer. Under the "Source" section, choose the DVD drive that contains the DVD you want to copy. Then, click the "Open DVD disk" button.
Step 4. MakeMKV will display a list of titles and tracks found on the DVD. Now you need to select the desired titles or tracks that you want to copy to hard drive.
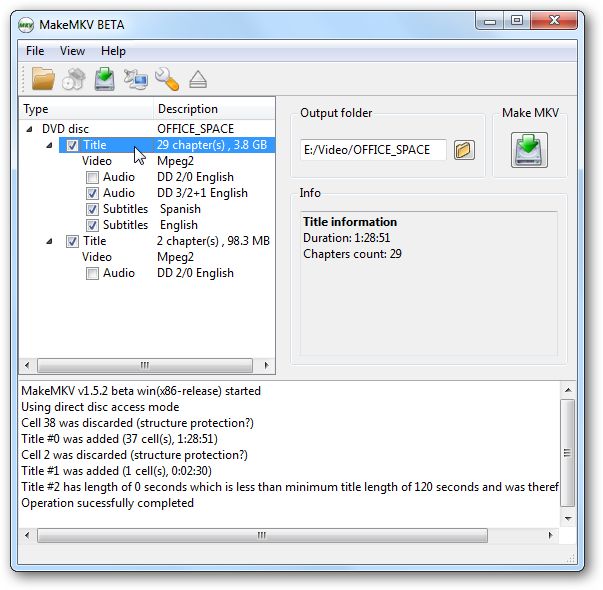 <
<Step 5. Specify the hard drive location on your computer where you want to save the copied DVD content.
Step 6. Click on the "Make MKV" button to begin the copying process. MakeMKV will convert the selected content from the DVD into an MKV file and save it to the hard drive.
Disadvantages of the Method:
- Support MKV format only.
- Output is uncompressed. Large file size.
- Lack editing options.
- Users are required to upgrade to new versions or input a registration key when new updates are released
FAQs about Copying DVD to Hard Drive
1. Is it legal to rip a DVD that you own to hard drive?
Whether it is legal to rip DVD that you own for personal use depends on where you live. In the US, it is illegal to rip a copy-protected DVD. But some countries may have different laws. Although you are probably not allowed to do that by law, you probably won't get sued/caught as long as you don't distribute the copies.
2. What's the fastest way to copy DVD to hard drive?
Among these methods mentioned above, EaseFab DVD Ripper is the fastest way to do this since it supports advanced GPU hardware acceleration. It can reach 300-500fps when ripping a DVD to MP4. Put another way, a 2-hour DVD can be converted to MP4 within 5 minutes only. In contrast, HandBrake may need hours to finish this.
3. How to copy DVD to external hard drive to watch on TV?
To do this, you can adopt EaseFab DVD Ripper for help. Below are the simple steps:
1. Download and install EaseFab DVD Ripper on your PC.
2. Insert target DVD into your computer's DVD drive or an external DVD drive connected to your computer.
3. Run EaseFab DVD Ripper and click "Load DVD" button to select and open the DVD you want to copy to external hard drive for TV.
4. Select the output format that your TV supports. On Output Profile panel, scroll down to "TVs/Players" and you'll find a few TV presets including Samsung TV, Sony TV, LG TV, etc. If you can't find a preset for your TV brand, you can simply go to "Common Video" category and choose MP4 Video which should be compatible with your TV.
5. Hit the "Convert" button to start ripping and copying DVD to external hard drive. Once done, you can connect the external hard drive to your TV and watch the movie on TV.
Conclusion
The process of copying a DVD to hard drive is easy with a tool as long as it has a ripping feature. If you are going to digitize DVDs and save DVDs to hard drive, there isn't too much trouble with Handbrake, VLC or any other DVD rippers. But if you want to download and save some recently released DVDs or some discs produced by Disney, Warner Bros or Paramount, you need to turn to a more powerful tool such as EaseFab DVD Ripper to rip the intricate DVDs.
You'll have a big chance to get a copy-protected DVD. Some DVDs are protected with fairly advanced encryption that general DVD rippers cannot overcome. They usually manifest themselves with 99 titles in disguise. When scanning the titles, most programs including Handbrake will have difficulties detecting what title to rip and finically produce screwed up rips, leaving you with nothing but out-of-whack movie, e.g. mixed up video, no sound, etc.
To summarize, if your goal is to copy a homemade DVD to hard drive without altering the file format or compressing the content, a simple copy and paste method will suffice. HandBrake can be considered as an option for copying unencrypted DVDs, although it has limitations in terms of output formats/presets and potential errors. On the other hand, VLC provides a straightforward solution for ripping DVDs without the need for additional software. However, if you're looking for an easy-to-use and feature-rich DVD ripper that supports both homemade and commercially copy-protected DVDs, EaseFab DVD Ripper is the recommended choice. If you're fine with MKV output, you can also give MakeMKV a try.