Playing videos on an iPhone (iPhone 6s & iPhone 6s Plus included) quite a headache if you just use its native video player, for the iPhones only support M4V, MP4 and MOV formats, which is quite limited. Fortunately, with the rapid development of the smartphone technology, the apps are developed more and more with powerful functions. With these third-party video player apps for iPhone we can almost meet our daily needs of working, entertainment and living trivia. However, even with a powerful video player, you may still get trouble during video playback on your iPhone. Sometimes, a special video format may cause your iPhone crash. That's why people need to encode the video files for iPhone for further smooth playback.
If you failed to play your movie files like MKV, VOB, AVI, TiVo, MPG, WMV, and more on your iPhone after trying all the efforts, you can follow this tutorial to learn how to encode videos to play on your iPhone without any trouble.
Method 1: Convert Video to iPhone Free With Handbrake
Handbrake is a famously-known free converter that allows you to rip DVD's but the new version also works wonders as a video conversion tool to get your favorite videos and movies onto your iPhone, iPod touch, iPad, and Apple TV. Now let's find out how to convert a video to iPhone compatible format and optimize it for your hardware.
The Steps:
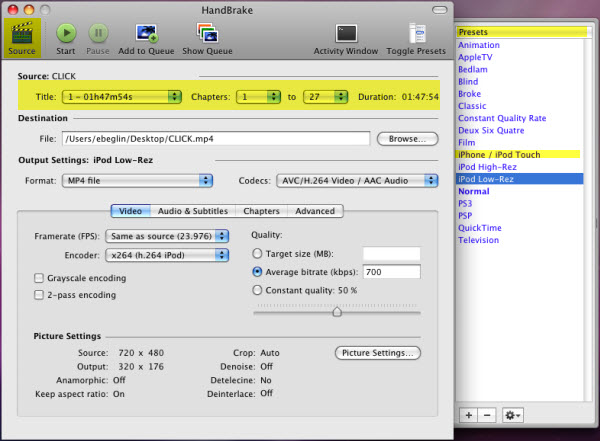
1. Add video files Run Handbrake and select the source video file you want to convert to iPhone compatible formats. DVD, AVI, MOV, MKV, etc all work fine.
Note: Handbrake can't rip encrypted DVD movies with the third party software, for converting protected DVDs, you can turn to EaseFab DVD Ripper for Mac or make sure you have downloaded and installed VLC Player on your Mac before.

2. Set a destination for your videos. There are 3 settings in the Destination part you can modify: file destination, codec and file format.
3. Select a preset. Handbrake provides some presets for Apple TV, iPhone, iPod, Sony PSP, Xbox etc. Click the "Picture Settings" button and go to the picture setting window. Compensate for grainy or interlaced, compressed looking video here. The Handbrake would have adjusted everything for you according to the presets you have set.
4. Start the conversion. Now, press the "Convert" button and stay back. The encoding time depends on the speed of your computer and the duration of your video file. After finishing the encoding, quit Handbrake. Connect your iPad, iPhone or iPod to your Mac and now you can transfer the converted videos to iTunes.
Note: Conversion settings are different from the iPhone 6S and the iPhone 4S, so be sure to specifically select iPhone if you plan on watching video on that rather than a classic iPhone. Also, if you have a new iPhone with retina display, be sure to select 'iPhone 4' instead. The videos will still play fine if you don't do this, they just won't look as good since they won't be optimized for the hardwares native resolution.
When Handbrake is done converting the video, you'll get a message and you can find the video in the destination source you set. The default is your desktop, so if all else fails just look there.
Converting and Optimizing Video for Different iPhones
You can tweak a bunch of settings within Handbrake to further optimize and compress conversions, but for quickly converting videos it's not really necessary since the default settings are spot-on. If you're new to converting video, the only setting I would recommend adjusting is the output format from the side tray, just choose the iOS hardware that you are most likely to watch the video on and it will optimize it for that.
You'll notice that the video settings adjust based on the iOS hardware selected, this is because the iPad and iPhone has a different video resolution than an iPod, which supports different resolutions than a new Apple TV or an iPod touch, and so on. Selecting "Universal" aims to go for universal compatibility, with a 720 X 448 resolution.
Remember, video always scales down to lower resolutions fine, but video scaling up is where you'll notice the compression artifacts and screen pixelation, so if in doubt select a higher resolution to convert to and you'll be able to enjoy it on a wider spectrum of hardware.
Method 2: Convert Video to iPhone With Handbrake Alternative
If you are a big fan of HandBrake and won't leave it anyway, then you must be very familiar with the HandBrake problems: not title found, video & audio sync, too long to convert, the ouput video a little bit distorted, output video formats are refined to MP4 and MKV, etc. Therefore, if you facing problems when converting videos with Handbrake, you'll need to look for a Handbrake alternative video converter. EaseFab Video Converter Ultimate for Mac is the bee's knees, which can help you convert videos yet DVD/Blu-ray to an iPhone supported video format with fast speed and excellent output image quality.
The program is highly remarkable for its powerful functions. It can convert any protected DVD/Blu-ray and any popular video formats like MKV, AVI, VOB, TiVo, AVCHD, MTS, FLV, WMV, and more. It has optimized presets for all the iPhone models, including iPhone 6s, iPhone 6s Plus, iPhone 6, iPhone 5s, iPhone 5c, iPhone 4s, iPhone 4, etc. as well as the iPad, Apple TV and iPod Touch. What's more, there are many outputs for Android, Xbox, and more devices.
Simple Steps to Encode Movies to Play on iPhone with EaseFab
Step 1. Add source video files
Load Discs: Insert the Blu-ray disc to the Blu-ray Disc drive or DVD to the DVD-ROM and click the Load Disc button to have movies uploaded to the Blu-ray Ripper. You can also import ISO files, IFO files or Blu-ray/DVD folder for conversion.
Add Videos: Click Add Files button to load video or audio files.
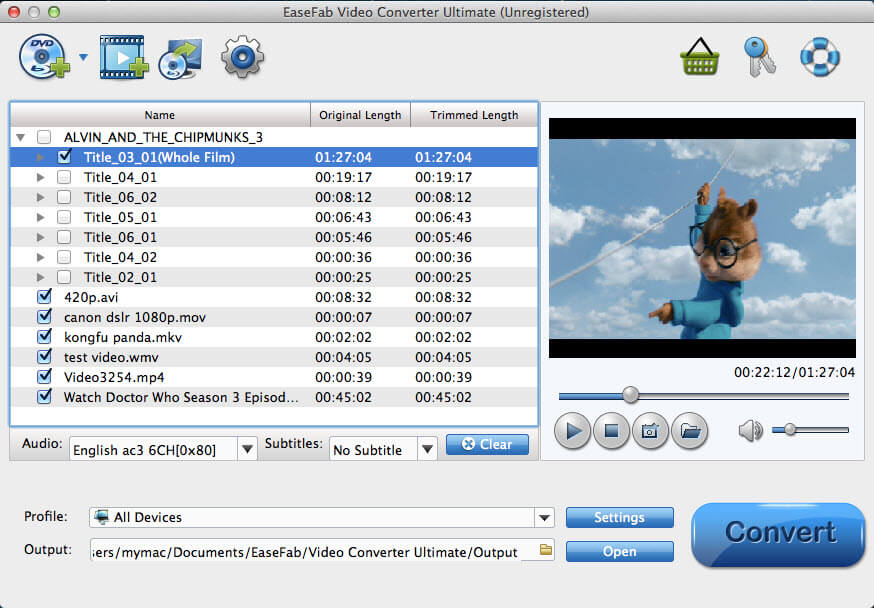
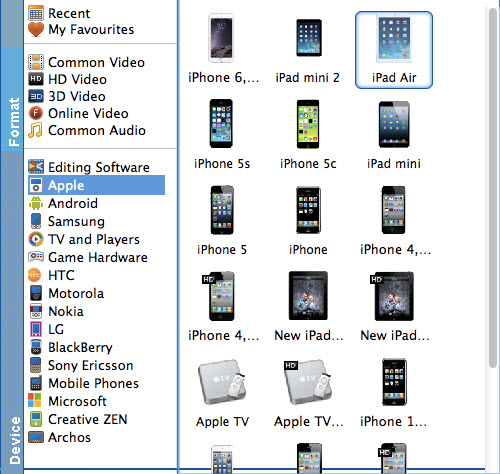
Step 2. Select iPhone model as the output format
Video presets for iPhone 6s, iPhone 6s, iPhone 6, iPhone 6 Plus, iPhone 5S, iPhone 5C, iPhone 5, iPhone 4S, iPhone 3GS, etc. are provided. You can just simply select your iPhone model as the output video format and this will remove all compatibility problems.
Step 3. Start the conversion
Once you've selected the output file format you want, you're ready to convert. Simply click the Convert button to let the software start converting your movie files. The ripping time depends on the quality and duration of the output movie. Wait for the conversion to be done and click Open to get the converted video files.
EaseFab Video Converter Ultimate for Mac gives the user an opportunity to merge several videos into one. It also provides room for video editing and removal of some unwanted portions. The user can even use it to create a personal video.