"I've got a 2 and a half hour 1080p ProRes file that I need to import into Avid. The problem is that it takes like 20 hours on import. I thought, since ProRes is an Apple codec, that I could just import the ProRes on an Avid/Mac machine, but no luck. I'm wondering if there's any way around the Apple ProRes to Avid Media Composer importing issue."
Media Composer, a professional software-based non-linear editing system is Avid's flagship product. It can support various commom videos for editing, but Apple ProRes codec can not be easily imported into Avid Media Composer in that it is difficult for Avid Media Composer to recognize and support Apple ProRes 422/444 codecs. Go through the Avid forum, some guys recommend trying to use ProRes files in Avid via AMA. While, it's too long for AMA to be effective we tried it.
Fortunately, there is an alternative easy way to fix the issue. The way recommended here is transcode Apple ProRes codec to Avid Media Composer more edit-friendly codec like DNxHD. Along some help from EaseFab Video Converter for Mac, you can do the job well and effortlessly.
As a professional and easy-to-use Apple ProRes encoder and decoder, the program supports all types of Apple ProRes codecs like ProRes 4444, ProRes 422 (HQ), ProRes 422, ProRes 422 (LT), and ProRes 422 (Proxy). It enables you to convert ProRes files to DNxHD video for Avid native editing. Besides, with it you can also convert ProRes to any other video or audio formats including AVI, MP4, WMV, MOV, 3GP, MKV, VOB, FLV, AAC, MP3 and more. If you want to encode ProRes MOV to Avid Media Composer on Windows, please get EaseFab Video Converter. Now download and install the program and follow the complete guide below.
Converting Apple ProRes to DNxHD for Avid MC5/6/7/8
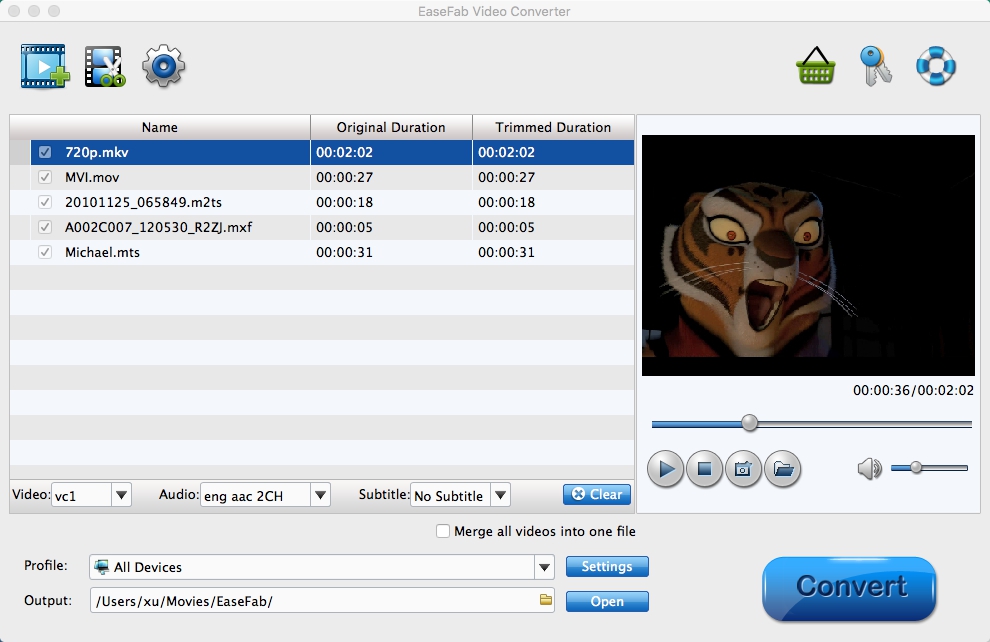
Step 1. Add Apple ProRes files
Install and launch the ProRes to DNxHD converter. Click Add button to load individual videos for converting. You can also directly drag and drop the media files to the program. (Note: batch conversion is supported, so you can load more than one file to save time.)
Tip: If you want to merge all imported Apple ProRes files into a big file, simply click the "Edit" menu to choose the "Merge Into One File" to combine all the added files into one file.
Step 2. Select output format as DNxHD
You can directly choose the DNxHD preset from "Editing Software" category for Avid Media Composer which has been supplied by the Apple ProRes to Avid Converter. The settings also works for Avid MC 8, Avid MC 7, Avid MC 6 and Avid MC 5 etc.
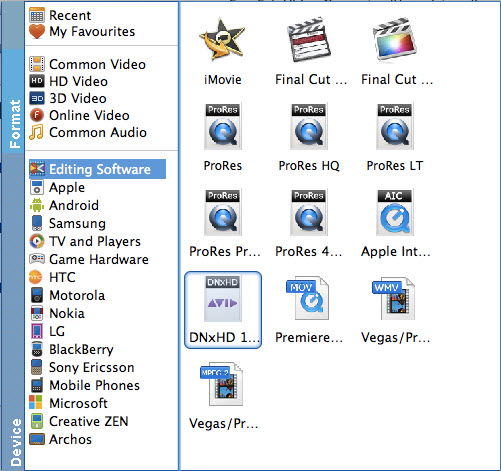
Tip: You can also click Settings to fix the frame rate, bitrate, audio and video quality to your needs.
Step 3. Start the conversion
Hit "Convert" button to start ProRes .mov to DNxHD .mov conversion. You can follow the conversion process from the pop-up windows.
After the conversion, launch AVID Media Composer and import the convert ProRes files to Avid Media Composer to create a project for smooth editing. No more worries about the Apple ProRes incompatibility with Avid Media Composer.
Alternative Way: Fast Import Apple ProRes .mov to AVID Pro Res .mxf Workflow
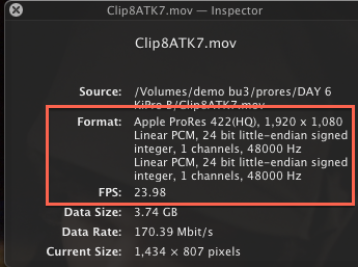
Before we get started it is imperative that you know what type of ProRes Quicktime .mov that we will be "Rewrapping" to an .mxf file that you will be working with in AVID.
To find out open the QuickTime files in QuickTime Player then go to > Window> Show Movie Inspector
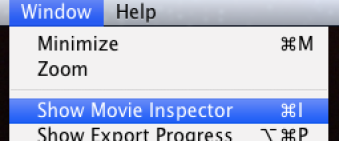
The two most important things to be aware of is the "Format" and the "FPS"
This file is AppleProRes 422(HQ) and is 1920 x 1080
Frames Per Second (FPS) is 23.98
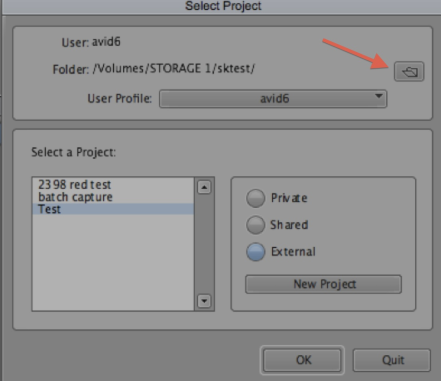
Step 1: Launch AVID Media Composer. Step one is to create a AVID Project. This window will allow you to set where you are setting the AVID project; Choose the folder icon to select where the project will go; Recommended - choose External and save to your external hard drive.
Step 2: Create a "New Project", Name the project, and then Choose the "Format"
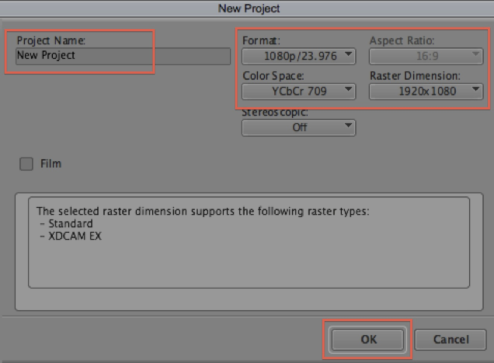
Note: This MUST match what you shot. If you shot 23.98 choose 23.98 if you shot 24 choose 24. If you shot 29.97 or 59.94 same thing.
THIS IS THE INFORMATION THAT WE FOUND OUT LOOKING AT THE FILES IN QUICKTIME PLAYER OUR TEST FILES WERE 23.98 SO OUR PROJECT WILL BE SET AS 1080P/23.976 1920X1080. OUR COLOR SPACE WILL BE YCBCR709
Step 3: Go to > File >Import and then select files to import > Click on Resolution Pulldown
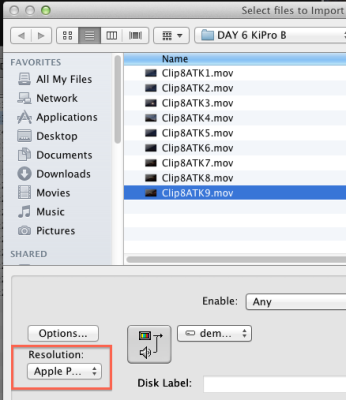
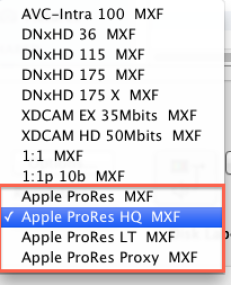
Note: Make sure you select the "Exact" same ProRes codec as the ProRes.mov files (REMEMBER WHAT YOU FOUND OUT IN QUICKTIME PLAYER) (Apple ProRes HQ MXF matches our test .mov files)
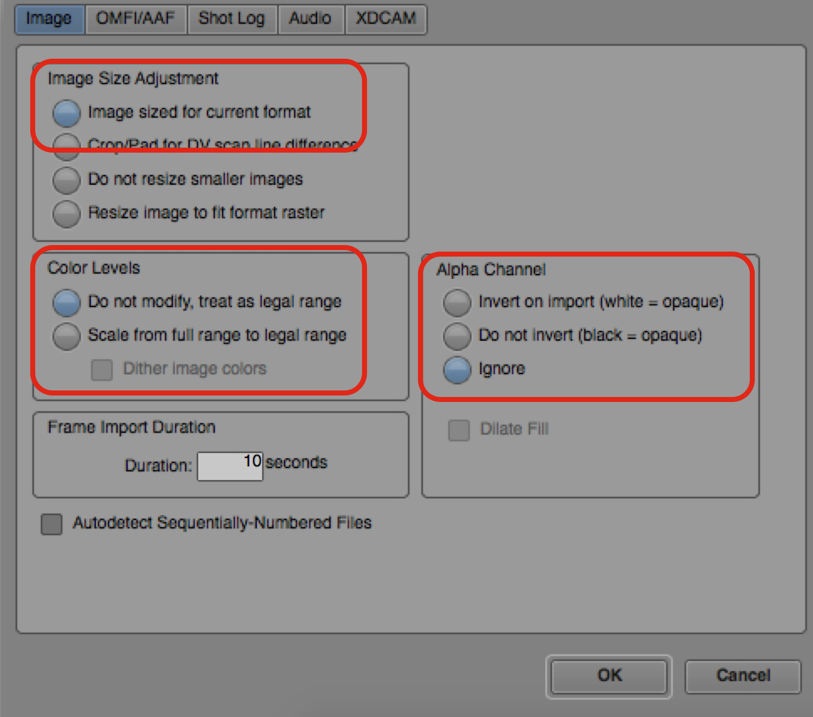
Step 4: Next click on "Options"

Import Settings > Choose the Image Tab > Color Levels - Choose Do not modify treat as legal range. That is all that needs to change. Click OK
After all the settings is OK, Select the clips to import and the hard drive that you want to save your files to and click "Open"
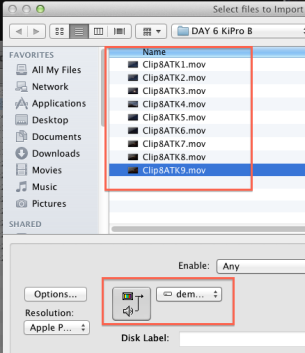
You will notice that the "Fast Import" of the clips will begin

Step 5: When the clips finish importing the files should look like this in the AVID Bin
Check the Video column and the codec should be the correct Apple ProRes setting and hard drive should be set to the correct destination selected in the import.

Step 6: Edit the with transcoded .mxf ProRes footage.