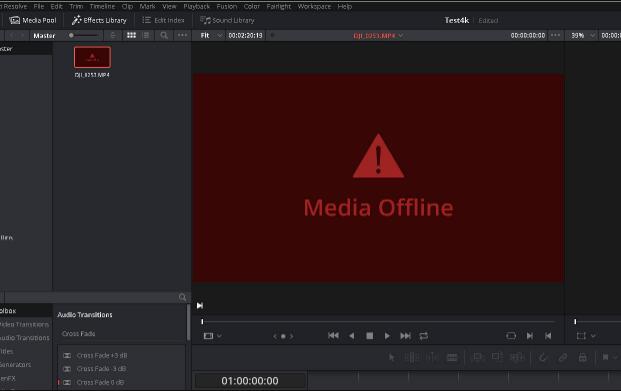
"Trying to read h.265 MP4 from Mavic 2 pro in Resolve 15 (not studio) in Win7. Unable to even read the file, keep getting "Media offline", tried 3 different clips, same issue on all of them. No problem with h.264 clips. This is my first go with h.265, anyone experienced this?"
"So this only seems to happen with h.265 videos in Davinci Resolve Studio 16.2. If I keep hardware accelerated decoding checked in Preferences while working with them, I get seemingly random "media offline" placed all over my media. Like, a few seconds of the actual video plays, and then media offline for like 0.5 - 3 seconds, then a few seconds of video, then media offline again, etc... Turning off Hardware Accelerated Decoding fixes it and allows me to work better, but I would prefer having my GPU do the heavy lifting of decoding."
More and more phones and prosumer cameras, for instance, iPhone 8 or later, DJI Phantom/Mavic drone, GoPro HERO 8 Black, Canon XF 705 Camera can shoot 4K (2160x3840) videos using the HEVC/H.265 codec, which is much more efficient than H.264 when it comes to compress videos for saving space and reducing the pressure of bandwidth while data transferring. However, editing 4K HEVC videos isn't an easy thing. Even those users who work with the professional DaVinci Resolve are reporting various problems, such as unable to read the file, keep getting "Media Offline" or "choppy or lagging 4K video playback" after importing. If you're encountering those issues when working with 4K HEVC/H.265 videos in DaVinci Resolve, here's what you need to know, also we will introduce an easy solution to fix the issues.
Something You Gotta Known About H.265/HEVC and DaVinci Resolve
As ultra-high definition video, bitrate of 4K HEVC videos is also larger than 480P/ 720P/ 1080P recordings. To be specific, HEVC offers roughly twice the image quality of H.264 at the same bit rate, or the same quality at half the bit rate. The H.264 codec is a very flexible codec for efficient video encoding. It comes in a number of profiles which can accommodate different capabilities when it comes to color bit-depth, chroma sub-sampling, resolution, and intra or inter-frame compression. The H.265 / HEVC codec is even more efficient, at the cost of higher complexity.
When working with HEVC/H.265, DaVinci Resolve has to decode H.265 / HEVC encoded files using your system CPU before full raster video frames can be processed, and while this has been improved in Resolve, it's still a problem for many on laptops and lower power systems to do this in real time. Working with HEVC codecs natively in DaVinci Resolve can also result in audio drift and sync issues over the duration of long clips. Working with 4k HEVC/H.265 content requires for fast CPU, fast GPU, a lot RAM, a large SSD, and more.
To edit 4K video on a relative budge ($1,100), you can build your computer with
CPU: Intel i7-9700K
Graphics Card: GTX 1050 Ti
Motherboard: MSI Z390-A Pro
RAM: 16GB DDR4
Storage 1: 500GB Crucial MX500 SSD
Storage 2: 2TB Seagate HDD
Power Supply: SeaSonic G-650
CPU Cooler: Cryorig H7
Case: Fractal Define R5
Operating System: Windows 10
If you're currently not planning to make the upgrade, how can you edit 4K videos in DaVinci Resolve smoothly? Transcoding HEVC/H.265 to Apple ProRes or Avid's DNxHD codec for DaVinci Resolve is the best solution to improve performance, stability and reliability throughout your post production workflow. And "transcoding" is also recommended by DaVinci Resolve officially.
Best Tool to Converting 4K HEVC to High-Qaulity Codec for DaVinci Resolve
H.265 are heavily compressed formats and while not ideal for editing in DaVinci Resolve and other video editors. Let's not to say some 10-bit HEVC videos shot in DLOG-M. Then, transcoding HEVC files becomes a highly recommended method, especially if your files are in 4K HEVC and you don't have a high-end computer.
You can use Handbrake to convert HEVC to H.264 MP4 for DaVinci Resolve use. But it isn't ideal if you're aiming for the highest quality, especially if you're planning to edit the HEVC files in something like DaVinci Resolve, Final Cut Pro or Adobe Premiere Pro. It's recompressing one compressed file into another compressed file, meaning the quality is going to take a further hit with that second-generation compression.
For the highest quality and smooth editing, you're recommended to transcode HEVC to Avid's DNxHD codec or Apple's ProRes codec - the files are way too big for sharing on the web conveniently–but the compression is minimal so the quality remains very high. I've yet to find a good free transcoder that meets those requirements, but there are some paid apps that can do it. The world of paid video transcoding apps is quite a mess. Some are very good, but some are downright dodgy. I'm not going to go down that rabbit hole, but there is aN easy-to-use yet powerful tool that really work for this:
EaseFab Video Converter - There are versions for Windows and Mac.
With it, you can easily and fast transcode any DaVinci Resolve incompatible video files including but not limited to MKV, VOB, MOV, HEVC/H.265 to high-quality Avid DNxHD codec or Apple ProRes codec. These formats can be well compatible with DaVinci Resolve. The DNxHD and ProRes preserve the best image quality and provides better performance when editing in DaVinci Resolve, but creates much larger files that use more storage space than H.264 file use. Apart from changing file format, EaseFab Video Converter can also convert your VFR videos to constant frame rate.
● Accept 8K/4K/1080p H.265/HEVC videos that come from GoPro action camera, DJI, Drone, iPhone, surveillance camera, IP camera, YouTube, etc,
● Output media like ProRes, DNxHD in file formats natively supported by DaVinci Resolve
● Convert video in 3 simple steps. Hardware acceleration makes it super fast.
● Easy editing experience: cut, crop, merge, apply effects, add watermark and more...
3 Simple Steps to Convert HEVC to DNxHD/ProRes for DaVinci Resolve
PS: The step-by-step guide is almost the same on PC and Mac. Here we will take EaseFab Video Converter for Mac as the example to show you the process.
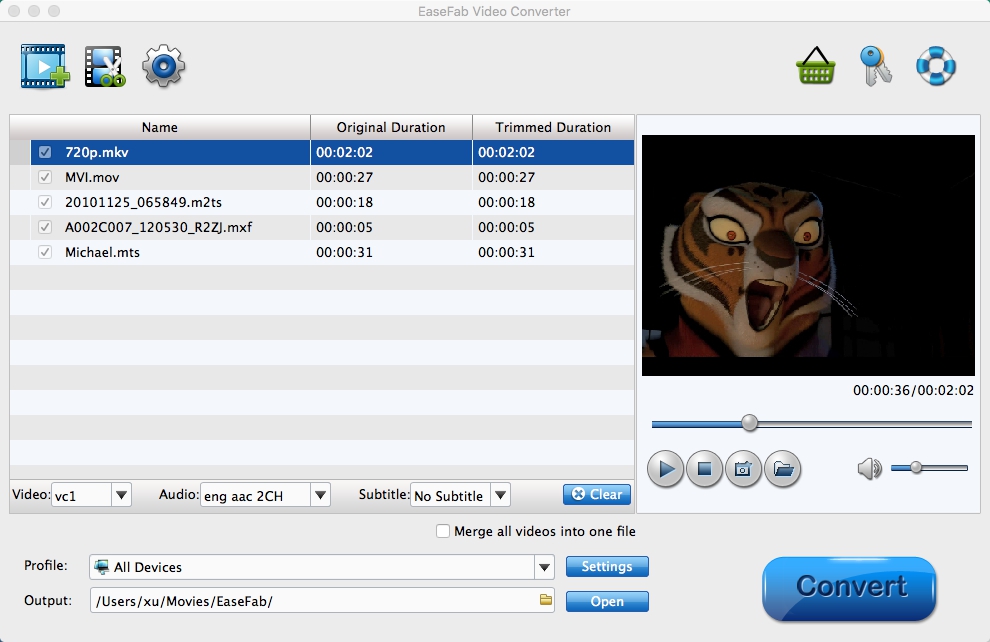
Step 1. Add HEVC/H.265 footage
After downloading, install and run EaseFab Video Converter, simply drag and drop your HEVC files to the program. You can also click Add Video button to load your source files. (Note: batch conversion is supported, so you can load more than one file to save time.)
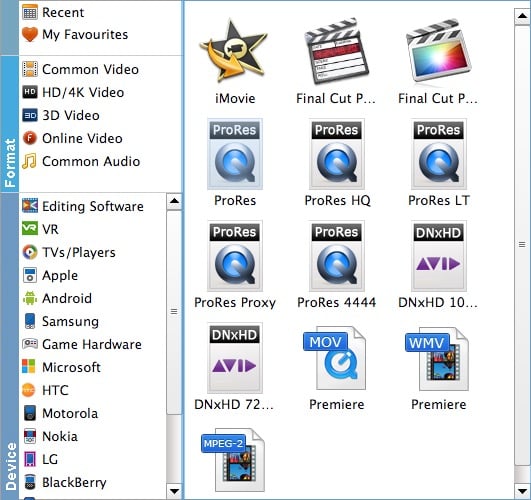
Step 2. Choose DNxHD or ProRes as the output format.
The Profile tray locates in the buttom of the window. From Editing Software you can select DNxHD 1080p, DNxHD 720p or ProRes as the output file. Both of the profiles can generate files with best image quality and better editing performance for DaVinci Resolve use.
Tips: You can also go to the Common Video category and select MP4 (encoded with H.264 codec) as the output file. The generated file can preserve image quality with the smallest file size when using in DaVinci Resolve. Moreover, you can cut video, remove black bars, apply effects by use its Edit function. Moreover, you can adjust codec, resolution, frame rate, bitrate, etc. using its Settings function.
Step 3. Start conversion
When everything is done, simply click the Convert button and the program will start converting your HEVC files rapidly.
Once done, you can click Open button to get the exported DNxHD or ProRes codec for editing in DaVinci Resolve with optimum performance.