Can the Nintendo Wii or Wii U play DVDs? This is probably the most frequent question asked by many Wii lovers. The answer is yes, but not directly. As a home video game console released by Nintendo, Wii provides various fun and intuitive games to most family. This wireless blue-tooth connection of remote controllers gives the whole family a great chance to play together, not just sit in couch. Although Wii and Wii U doesn't support playing DVD directly, thanks to the advancement of technology, you can play DVDs on a Wii as long as you get the right method. In this article, we will mainly introduce two popular methods to help Wii/Wii users to enjoy DVDs on your game console without any trouble.

Click the links below to jump to the part you are most interested in.
Method 1: Use Homebrew to play DVD on Wii/Wii U
- Free But Risky, Not Recommended by the Official
This is a free yet risky method. Yet it is reasonable that some risks come along when you are installing some unofficial and third-party software. And the official site of the device says "No" to this question. But using The Homebrew channel you can play your disc on this glowing blue drive. I know it's old news for some, but for those of you who always wished that glowing blue drive could play your games as well as your movies, it's now easier than ever. Here's how to it, no warranty voiding mod-chip required.
This method is designed by the team of Wii coders which provides the option to the users for unlocking Wii and playing their DVDs. Using this solution, you need to download the homebrew video player which is also known as Wii unlocker, copy the file to the SD card and then use the Channel to apply the 2-second patch. Once the patch is up ad runs, you need to open the Wii Mplayer app from the Homebrew channel, insert the disc and let Wii play DVD.
What you need:
Though the method of Homebrew Channel seems to be simple, certain requirements needs to be fulfilled before proceeding with the actual steps.
● A Nintendo Wii console with system version 3.2
● A FAT/FAT32 formatted SD card below 2GB as Wii cannot read SDHC cards
● An SD card reader/writer (alternatively, you can also use a USB device which works as one).
● The Legend of Zelda : Twilight Princess for Wii
● The Twilight Hack. It is a modified Zelda game that runs the Homebrew Channel Installer)
● A Homebrew Channel Installer
● Media Player which is compatible of playing commercial DVDs (MPlayer)
● DVDX app which allows Wii to read the inserted DVDs

Steps on how to watch DVD on a Wii/Wii U via The Homebrew Channel:
It is important to note that there are two essential steps that need to be carried in order to successfully play DVDs in Wii. These processes include installation of the Homebrew Channel as well as the DVD player.
Step 1: Install the Homebrew Channel.
1. Insert the SD card into the slot of the reader and copy the “private” directory of the Twilight Hack on your card. Here you also need to copy the Homebrew Channel “boot.dol” file.
2. Next, insert the SD card in the Wii and then delete the saved Zelda file on Wii File Manager. If you do not have the game already, you can start a new one.
3. There comes 2 versions of the Zelda- RVL-RZDE-0A-0" or "RVL-RZDE-0A-2. Though both these versions work, but you need to check and apply the correct hack. For example, RVL-RZDE-0A-0 works with TwilightHack0 while RVL-RZDE-0A-2 is compatible with TwilightHack2, both are available in the package.
4. Next, move to the file manager and then switch the SD view. Now copy the correct version of the hack.
5. Finally, insert the game disk of Zelda, start the game, and then save it. After the Homebrew Channel installer starts, you can enjoy playing your DVDs.
After the process is complete, you can access the Homebrew channel like any other Wii program.
Step 2: Install DVD Playback program.
1. Once HBC is successfully installed you now need the installation of a third party DVD player which will allow you to play your discs on Wii consoles.
2. On your SD card, find a space which is safe and where you can install and copy the third party DVD player app.
3. Insert the SD card in your console and start HBC. You will have access to the 2 programs which are present on your SD card. Next, run the DVDX installer app. Select the "Normal installation" as it ensures smooth running of the program without any issues.
Step 3: Play DVD on Wii.
1. Go to HBC and select MPlayer.
2.Select DVD-Video and then choose the Title.
3. Finally, play your desired DVD.
The good:
Once installed, you can then pop into the MPlayer app from the Homebrew Channel, put a video DVD in the drive, and your favorite video will be right in front of you in no time.
The bad:
You have to download a homebrew video player, copy them to an SD card, and use the Homebrew Channel to apply a two-second patch. And you have to take note that there's a corresponding risk on the Wii if you do something wrong.
Method 2: Play Any DVD on Wii/Wii U via EaseFab DVD Ripper [Recommended]
- Easier, More Efficient and Safe
Is there an easier and safe way to play DVD on Wii/Wii U without homedrew? Absolutely Yes! We know that Wii is a video console which means it can play videos, no question. We can rip and convert DVD to Wii/Wii U compatible formats for for further playback without any risk to brick your Wii.
Though this method is much safe and easy, here is one rule that you’d better bear in mind. That is only AVI format files encoded as motion JPEG or MOV files encoded as motion JPEG are supported by the Photo Channel on Wii, which means you can only convert your DVDs to AVI format. And also your video resolution should be up to 848X480.
What You Need to Rip DVDs for Playing on Wii/Wii U:
● Your DVD discs.
● A PC or Mac with DVD drive. If your PC or Mac doesn't come with internal DVD drive, then an exteranl DVD drive will be necessary. And an external good DVD drive can be purchased as little as $15.
● A program to rip the DVD discs. We'll be using EaseFab DVD Ripper in this guide, which is available for both PC and Mac.
EaseFab DVD Ripper is a totally clean, fast and user-friendly DVD ripping program. It can cope with all types of DVDs, from new discs, 99-title, damaged, Japanese, regional, workout to non-standard DVDs. With it, you can effortlessly extract the entire content out of a DVD and save it in any mainstream video formats such as MP4, MKV, H264, HEVC, AVI, WMV, MOV, etc. which is readable by external hard drive HDD, SSD, NAS, USB, thumb drive, and the like. You can also copy DVD to hard drive in Video_TS folder, MPEG-2 (a single VOB file that contain the main movie) in 1:1 ratio while keeping the original videos, audios and subtitles within only 5 minutes.
What's more, it offers 350+ preprogrammed optimization profiles for specific devices such as smartphones, tablets, gaming systems, smart TVs, VR and more. The most important here is that it offers an optimized preset for Wii/Wii U users and this will help you save much time to adjust the settings to set the quality-size balance for ripping DVD to Wii/Wii U with best results.
This is all you need. Once you have all three of these things ready, grab your favorite DVD movies and get started to rip DVD for Wii/Wii U. To begin with, you need to download and install EaseFab DVD Ripper Windows or Mac version on your computer. The guide below takes the Windows version for an example. Mac version has the same process.
3 Simple Steps to Convert DVDs for Playing on Wii/Wii U
Step 1: Load the source DVD files.
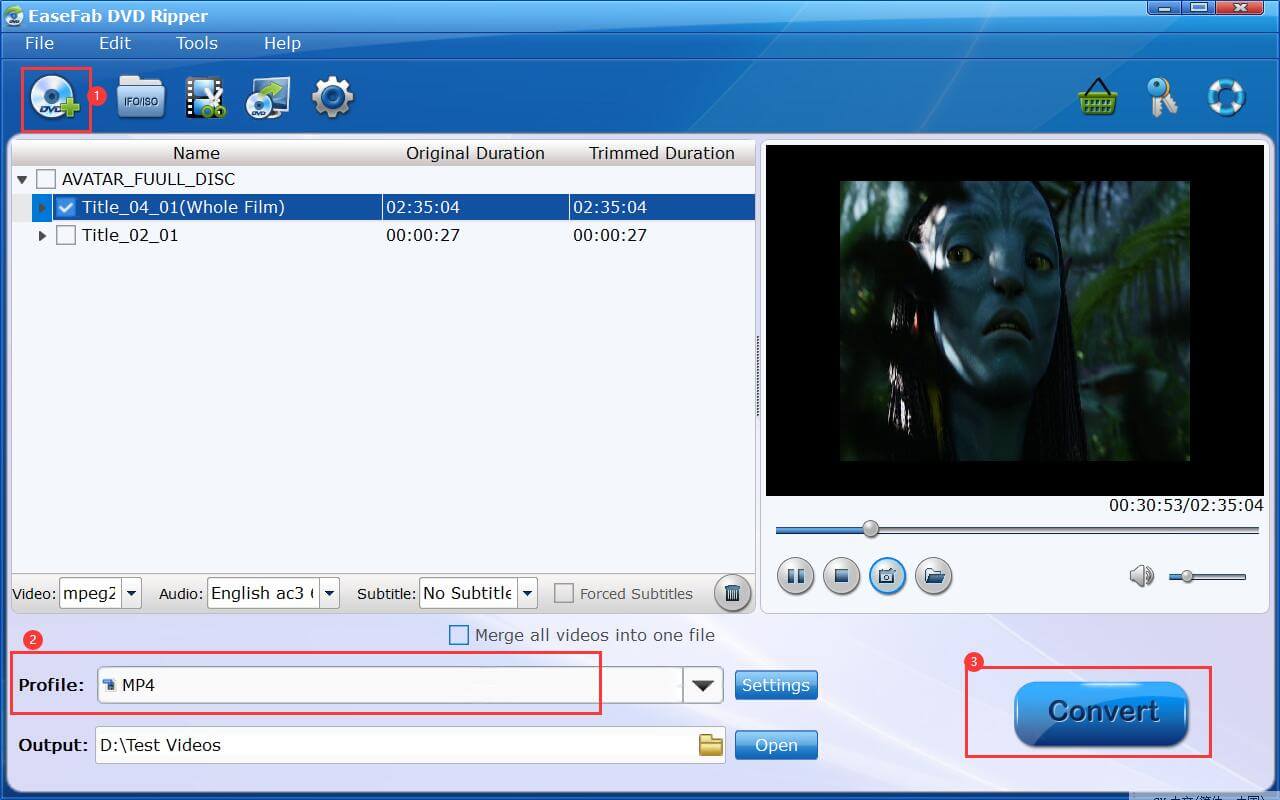
Insert the DVD disc into your computer's DVD drive or an external USB DVD drive. Launch EaseFab DVD Ripper, click Load DVD to add the DVD files to the program. This powerful DVD ripper could auto analyze and detect the right DVD main title for you. (You can also choose DVD ISO Image file or DVD folder as the input)

Step 2: Select the optimized preset for Wii.
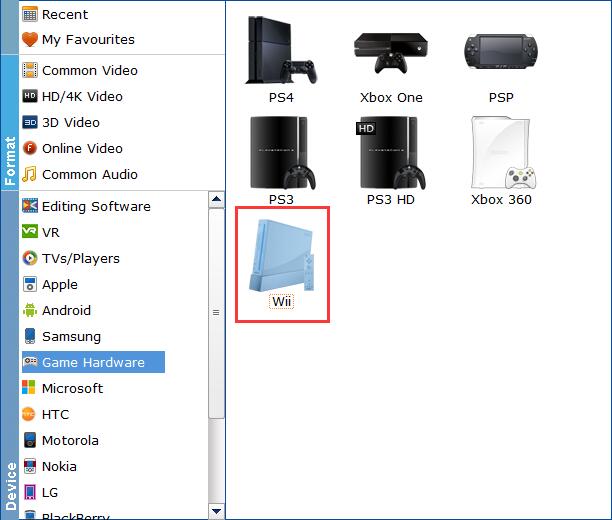
Click Profile bar and move mouse cursor to Game Hardware, click and select "Wii" as the output profile. This Wii preset is an AVI(MJPEG) video format optimized for Wii and Wii U.

Step 3: Start ripping.
Click the small Folder button (located in the output bar) to select a target folder to store the ripped DVD video. All things done, hit Convert button to start ripping DVD to Wii/Wii compatible AVI files.
Possible Reason for Wii/Wii U Not Providing Support for DVD Playback
Most likely because by the time Wii was released, stand-alone DVD players were already pretty cheap, streaming was just starting to become popular (Wii was one of the first gaming devices to have a Netflix app, before even Xbox 360) and Nintendo would have had to pay a per-device license fee for DVD functionality which would have just added cost to the system for something not everyone would use.
FAQs for Playing DVD on Wii/Wii U
Q1: Can the Wii U play DVDs?
Released on 2012, Wii U is a successor of Wii. According to its official website, the answer to the question of “can the Wii U play DVDs” is No. But it can be achieved by the methods mentioned above.
Q2: Does an external DVD drive work on the Wii U?
Nope. Plus the Wii U uses a modified Blu-ray standard anyways, so a DVD drive wouldn't work at all regardless.
Q3: Does Wii play Blu-ray discs?
Wii can play Blu-ray discs on the condition that you have converted the Blu-rays into the AVI format with a Blu-ray ripper. Speaking of which you can check out the most qualified Blu-ray ripper software - EaseFab Blu-ray Ripper - if needed.
