In terms of compression efficiency, H.265/HEVC is better compared to H.264. It saves space and reduces bandwidth pressure during data transfer. It is for these reasons that compression of 4K videos captured by GoPro, iPhone 7 or later, DJI Phantom/Mavic dron, etc is preferably in the HEVC video codec. Apple's support for HEVC is built into iOS 11 and later and macOS High Sierra and later, letting you view, edit, or duplicate this media in a variety of apps, including Photos, iMovie, and QuickTime Player. However, the importing process of 4K HEVC/H.265 to iMovie is, however, not a walk in the park. Codec incompatibility, lagging, or choppy problems are some issues you can expect when you import your videos. When you want to troubleshoot any editing issues of 4K H.265/HEVC in iMovie, the below solution will come in handy.
Note: Even the latest iMovie is hard to read H.265/HEVC 10-bit Videos shot in Dlog-M according to a growing mass of user reports. This is actually a known issue cause by long-GOP codec. The common ways to fix it out is upgrading your PC/graphics card and downscaling/transcoding the 4K HEVC video to 1080p video in H.264 codec for using in iMovie. Keep reading to find detailed solutions.
If you need the easiest solution to import 4K HEVC/H.265 videos to iMovie:
Convert HEVC to an iMovie compatible format.
Featured with the most advanced converting technology, the latest EaseFab Video Converter for Mac is now providing the most reliable and professional H.265 encoding/decoding solutions to almost all NLEs issues. In general, it provides hundreds of output format presets, such as AIC for iMovie, Apple ProRes for FCP, DNxHD for Avid, MPEG-2 for Adobe Premiere, etc. Besides H.265, this ideal converter is also available to deal with other video formats including MTS, MXF, MOV, XAVC, MKV, AVI .etc. Now, download the tool and start the H.265/HEVC to iMovie conversion.
3 Simple Steps Convert 4K HEVC/H265 to iMovie Editing-friendly codec
Step 1. Import H.265 videos
Install the H.265 to iMovie Converter and run it. Drag the H.265 files to the software. Or you can also click "Add" button on the top of the main interface to import video to the program. (Note: batch conversion is supported, so you can load more than one file to save time.)
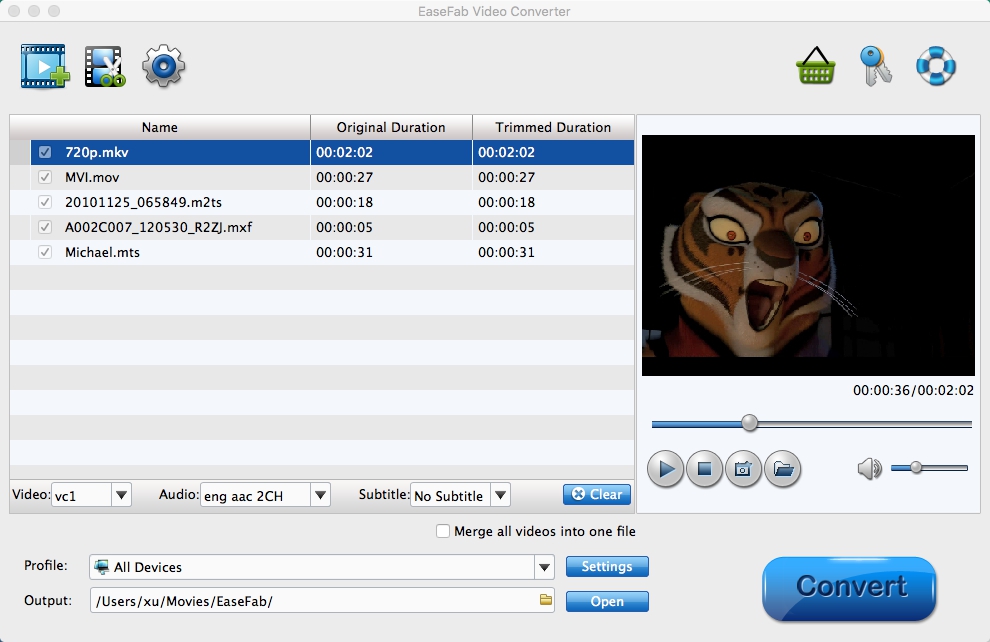
Step 2. Choose the optimized preset for iMovie
The program has already optimized the video settings for iMovie. The output videos will keep the original quality of H.265 video files. The setting also works for iMovie '08, iMovie '09, iMovie '11, and iMovie HD etc. Moreover, the Mac program has some simple edit functions like cropping, splitting, adding effects etc.

Tips: Adjust video, audio settings
Click the "Settings" button and customize proper video/audio parameters including Video size, bitrate and fame rate and mroe. Usually 1920*1080 video size and 30fps video frame rate are recommended for iMovie editing.
Step 3. Start H.265 to iMovie conversion
Now click the "Convert" button, and then leave the H.265 to iMovie Mac Video Converter to do the rest automatically for you. The converter works on MacBook, MacBook Pro, MacBook Air, iMac powered by macOS Sierra, El Capitan, Yosemite, Mavericks, Mountain Lion, Lion, or Snow Leopard.
Step 4. Import the converted HEVC/H.265 video to iMovie
Finally, launch iMovie. In iMovie, go to the File menu, choose Import > Movies, and then navigate to the folder that your output H.265 files are saved. Select the files and click "Import".